Best practices for loading and firing your kiln.

Best Practices for Loading and Firing Your Skutt Kiln

Skutt electric kilns are designed with the goal of having uniform heat throughout the entire kiln chamber. This is primarily accomplished through the use of balanced elements installed at the top and bottom of the kilns to help compensate for the natural heat loss that occurs through the lid and floor of a kiln. The center of the electric kiln is typically the hottest area simply because of a higher concentration of elements. By putting elements that get slightly hotter at the top and bottom of the kiln and elements that don’t fire as hot in the center of the kiln, the heat is more evenly distributed throughout the entire chamber.

Balanced elements do a good job of evening out the heat throughout a kiln, especially taller models like the 1027 and 1227, but other factors can influence distribution of heat and cone bends throughout the chamber including:

• Separation of kiln shelf layers
• Thermocouple placement
• Evenness of kiln load
• Density of load
• Shelf size
• Firing speed/heating rates
• Hold time
• Use of an EnviroVent 2 downdraft system
• Cone type
• Cone placement

Separation of Kiln Shelf Layers and Thermocouple Placement

There are many reasons that a kiln can fire unevenly. Barring a mechanical problem like an element or relay not functioning, the most common issue we encounter is poorly loaded kilns with shelves stacked too tightly together.

Separation of kiln shelf layers can have a dramatic effect on fired results. The tighter the shelf layers, the more challenging it is for radiant heat from the elements to penetrate evenly between the layers. This is especially true at the top and bottom of the kiln where a more significant amount of heat is lost through the lid and floor slabs. Balanced elements help, but they can only do so much to compensate.

Recommended loading patterns include placing a one-inch post on the kiln floor, then the first kiln shelf, followed by a 5-6-inch-tall kiln post and then the second shelf layer, etc. Using a taller kiln post between the first and second layer in the bottom of the kiln effectively exposes that layer to two full rows of element coils in the side walls. This typically gives the best ability for more uniform heat in that area.

The same theory holds true at the top of the kiln.  The uppermost shelf should be placed no closer than approximately 5 inches from the underside of the lid, such that two full rows of element coils are visible to radiate heat onto that shelf layer.  Shelves stacked tighter at the top and bottom of the kiln have a greater likelihood of being underfired.  While each kiln is different and some clay and glazes are more forgiving than others, if consistency and uniformity of heat is required, then the shelves at the top and bottom of the kiln need to be exposed to more radiant heat.

The shelves in the center of the kiln can generally be stacked somewhat tighter because it is naturally hotter in that area.  Two-inch posts can potentially be used for flat objects, but often three inch or taller posts are better for low objects.  The exception to this is the shelf layer near the thermocouple in the middle of the kiln.  Skutt recommends an ideal clearance of two inches all around the tip of the thermocouple so that it can measure temperature unobstructed.  Kiln shelves, posts, or pottery placed very close to the tip of the thermocouple can interfere with its ability to measure air temperatures accurately. 

Density and Evenness of Kiln Load

Evenness of kiln load and density of load can also impact fired results.  Tall kilns that are loaded very unevenly will not fire uniformly.  Four shelf layers in a 27-inch-tall kiln is average.  If six-inch posts were used between each of the four layers, the load would be very evenly distributed and the kiln should fire quite evenly.  However, as an extreme example, if all four layers were stacked with plates at the bottom of the kiln using two-inch posts between the layers and the uppermost shelf was wide open to the lid, the kiln would not fire accurately and the plates on the lower shelves would be underfired because the heat could not radiate in between the very tight layers. 

Kilns can be successfully fired partially full if needed.  For instance, if there is enough work to fill approximately 40% or more of the kiln, the items should be spread out to make use of the entire kiln chamber, rather than being concentrated at the bottom of the kiln.  If there is less than 40%, or approximately 1/3 of a full kiln load, then the shelves should be propped up and the pieces placed on one or two shelf layers in the center of the kiln.  Taller kiln posts (approximately six inches) should be used to separate the shelves in this case to let the kiln to be as open as possible between those layers and to allow ample room around the thermocouple.    

Kiln Shelf Size

Selection of kiln shelf size in relation to chamber size is also important.  Shelves that are too wide for the chamber can restrict heat flow throughout the kiln.  Ideally, there should be approximately one-inch or more of clearance between the edge of the kiln shelf and the wall of the kiln chamber.  Shelves that extend too close to the kiln wall can effectively cut off the ability of heat to move more easily throughout the kiln chamber. 

Firing Speed

The choice of firing speed should be made according to the scale of work and cone temperature being fired to.  The kiln should be fired according to the needs of the weakest link inside, which is the biggest, thickest, or wettest item in the firing. 

Preset modes include Slow, Medium, and Fast.  Fast is primarily designed for China paints, lusters, overglazes, and decals – firings that go to relatively low temperatures and can be done quickly.  Fast mode can occasionally be used successfully for some higher temperature glaze firings, but it is often not recommended because it is typically too fast for most clay and glazes to mature properly.  It is not recommended for most bisque firings.  More often the choice should be limited to Slow or Medium.  The selection is decided based on how physically thick or large is the work in the kiln.  As a general rule, the larger or thicker the item, the slower it should be fired. 

Work that is similar in thickness to that of a pencil (3/8” or less) is generally considered “average” thickness and can be safely fired on Medium speed.  The exception to this would be for very large objects.  Items approximately 15-18 inches or more in any dimension or pieces that nearly fill the full width or height of the kiln should be fired on Slow so that the entirety of the piece can heat up more uniformly. 

Items that are approximately 1/2-inch thick should be fired on Slow.  These would be considered “thick” and need to be fired more slowly so that the exterior of the clay does not get substantially hotter than the interior.  A significant temperature differential on the same piece, because of thickness or extreme size, can lead to stress in the clay which promotes cracking.  Items that are more than approximately ¾-1-inch thick or greater may need to be fired using a custom program that slows the entire program down even more to accommodate for the extra thickness. 

Heating and Cooling Rates

The programmed heating rate in the final segment of the firing is what primarily impacts the heat work attained in the kiln.  Heat work is the measurement of time and temperature together.  The faster something is fired, the hotter the peak temperature needs to be.  The slower it goes, the lower the temp can be.  Fast mode is programmed to heat at a rate of 200 °F per hour in the final 250 °F of the program.  For comparison, the Medium speed mode is programmed at 120 °F per hour and Slow is at 80 °F per hour.  Orton calibrates their cones to a rate of 108 °F per hour in the final segment. 

Because heat work is achieved during the final segment, cooling rates, unless programmed to be exceptionally slow, do not typically impact cone bend results in electric kilns the way they might in a gas kiln with substantially thicker walls and more mass that continues to radiate heat after the firing has completed.  Electric kilns typically drop rapidly in temperature very quickly after the power is shut off to the elements.  The rate is quick enough that 200 °F can easily be lost in the first 20 minutes following completion of a firing.  Once the kiln has cooled that much, heat work is no longer a factor for the clay and glaze maturity. 

Hold Time

A short hold time of 5-15 minutes at the peak temperature is a simple method of helping to even out heat work throughout a kiln chamber.  For example, if one section of the kiln is a half cone cooler than the rest of the kiln, a 10-minute hold at the peak temperature may be all that is needed to even out the heat work in the kiln.  Because the middle of the kiln tends to be the hottest area, the hold time will tend to fire the middle of the kiln slightly hotter.  For clay and glazes that appear to be underfired when the target cone is partially bent, this is a good indication that they can handle the extra heat.  In this instance, firing to get the coolest part of the kiln up to a minimum cone temperature is appropriate strategy even if it risks getting the middle of the kiln slightly hotter. 

Downdraft Venting

A properly installed EnviroVent 2 downdraft vent system can also have a slight impact on heat uniformity in the kiln chamber when it is operating by drawing a small amount of heat toward the bottom of the kiln. 

Cone Type and Placement

Skutt recommends using Orton self-supporting witness cones for the most accurate measurement of ceramic heat work.  If large witness cones are used, they should be placed into Orton cone plaques rather than lumps of clay for more consistency.  Junior kiln sitter cones are not designed to be used as witness cones. 

Cones should be placed approximately 2 inches from the edge of the kiln shelf so that they are in a similar location to the heat being measured by the tip of the thermocouple.  Cones placed in the middle of the kiln shelf will naturally be slightly cooler, especially in larger diameter kilns, because they are physically further away from the radiant heat of the elements and they may be shielded by pottery in the kiln.  The variation will not be dramatic but it would be enough to show a difference in the cone bend.  If a user is comfortable monitoring cones during a firing while wearing kiln glasses, the cones can be placed directly in front of the peep holes for viewing during the firing.  If only one cone is used, it should be placed on the kiln shelf closest to the thermocouple.  As a general practice for consistency, cones should routinely be placed in the same location in the kiln during each firing for better comparison over time. 

Check out more helpful kiln articles on our blog

Share this post
Facebooktwitterpinterestlinkedintumblrmail

Crystalline Glazes with Skutt Kilns

Why High-Fire Crystalline Glazing Needs the Right Ceramic Kiln

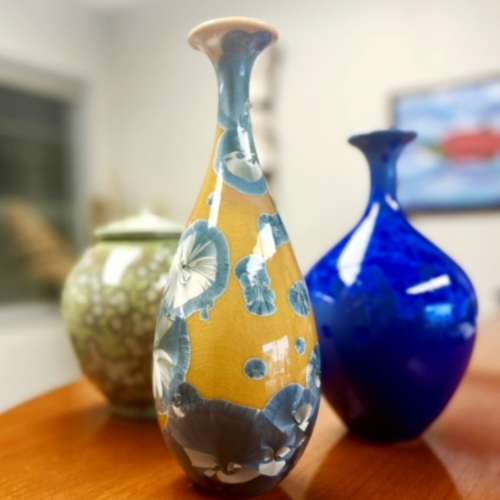
Skutt understands that creating high-fire crystalline glazes can be demanding on an electric kiln. Choosing the right ceramic kiln is essential for crystalline firing. This unique glazing technique requires a kiln with a significant power-to-size ratio, durable elements for high heat, effective thermal insulation, an accurate thermocouple, long-lasting relays, and a controller that supports custom programming.A picture of vases with crystalline vases.

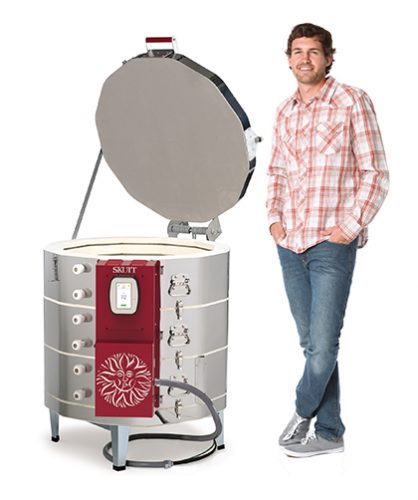
The Skutt Production Kiln (PK) series is particularly well suited to repeated high-fire crystalline glazing, especially when outfitted with APM elements, a Type S thermocouple, and a touchscreen controller. For smaller firing needs, Skutt’s 1018-3, 822-3 or 818-3 are excellent alternatives with the above listed upgrades.

Skutt Production Kilns: Built for Power and Efficiency

Skutt’s PK line of ceramic kilns provide the extra power required to reach Cone 10 temperatures reliably. Designed to draw more amperage than a standard kiln, Skutt Production Kilns feature a higher power-to-size ratio, enabling the elements to work more efficiently because they don’t have to work as hard during each firing, which helps them last longer. A kiln that can reach peak temperatures faster also costs less to fire and yields more consistent glaze results.


Optimizing Kiln Elements for High Temperatures

All Skutt kilns are built with top-of-the-line Kanthal A-1 elements. Heating elements have a natural lifespan, and firing to Cone 10 temperatures will wear them out more quickly than firing to lower temperatures. For repeated high-fire crystalline programs, upgrading to APM elements will extend their lifespan. APM elements don’t draw more power or make the kiln fire hotter, but their manufacturing process allows them to withstand high heat exposure better.

APM elements are essentially standard Kanthal elements that have been ground, melted, and re-extruded into new wire. This additional processing gives the element additional dimensional stability, preventing it from sagging or collapsing after repeated high temperature firings. Elements are more likely to collapse when firing to or holding at high temperatures, which reduces their effective lifespan. An APM element can last about three times longer than a standard element when firing to Cone 10.

Thermal Insulation for High-Temp Firing Efficiency

Additional thermal insulation is key to efficiency at high temperatures. All of the Production Kiln models are built with energy saving 3-inch-thick walls, lids, and floors. This helps retain heat better than the standard 2.5-inch-thick walls of other models. More insulation means less heat loss. Elements that do not have to work as hard to reach and maintain peak temperatures will last longer.

Using a Thermocouple for Precise Temperature Control

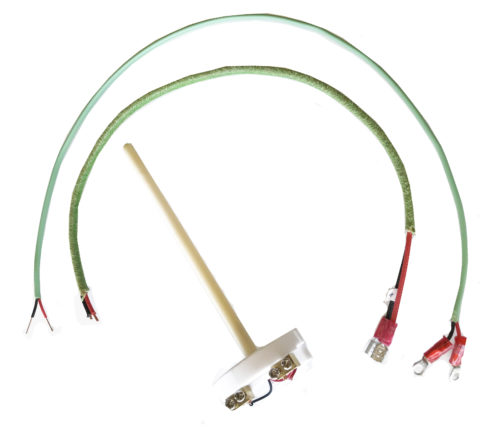
Crystalline glaze firing requires precision temperature measurements, and a quality thermocouple is essential for consistent results. A Type S thermocouple is a beneficial upgrade for frequent high temperature firings in any kiln, but is crucial to crystalline glaze firing, which requires precise temperature control. Most Skutt kilns are fitted with a standard Type K thermocouple, but nearly all Skutt kilns can be upgraded to Type S. A standard thermocouple can be fired to Cone 10, but it oxidizes and sheds black metal flakes, causing it to wear out quickly and need frequent replacement.

However, a Type S thermocouple is made of platinum and doesn’t wear out, even when fired to Cone 10. It doesn’t shed any metal flakes, has a working temperature rating of over 2900*F, is accurate to within +/- 0.25% of the temperature, and can virtually last forever, provided it isn’t physically damaged.

Type S thermocouples are more expensive than standard Type K thermocouples, but the precision, lifespan, and lack of shedding make them worth the price for crystalline potters. The only downside to a Type S thermocouple is its fragility. If the thermocouple is struck by a kiln shelf during loading or unloading, it can break easily.

Choosing Solid State Relays for Durability

All computerized kilns use relays to control power to the heating elements. Most kilns have mechanical relays with moving parts, but Skutt Production Kilns use solid state relays, which have no moving parts. This makes solid state more durable and quieter compared to mechanical relays, which make a clicking noise during operation. The life of a mechanical relay is measured by the number of times it turns on and off, which can be tens of thousands during its lifespan, eventually wearing out and needing to be replaced. Anyone who has fired a kiln knows that a relay failure in the middle of a glaze firing can ruin a perfectly good day.

Solid state relays, on the other hand, don’t tend to wear out over time. Crystalline firings with long holds at high temperatures put standard relays to the test with every firing. Using solid state relays, which have no moving parts to cycle power to the elements, means there is one less component likely to wear out and ruin a firing.

Advanced Programming with the KilnMaster Touchscreen

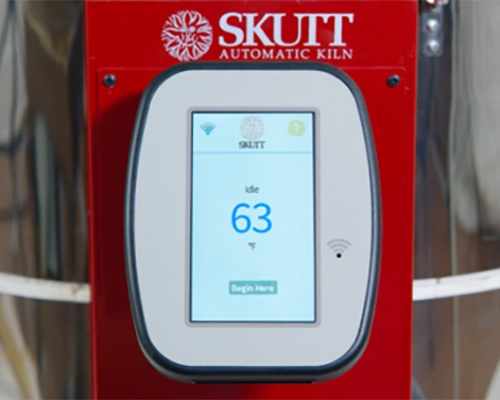
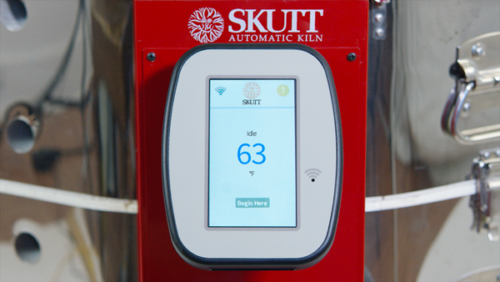
Crystalline firing requires unique programs to achieve specific glaze results, so having a computerized controller capable of setting up a complex program is critical. Skutt’s KilnMaster Touchscreen (KMT) controller allows users to program up to 36 custom programs, each with up to 16 individual segments. The large screen provides the option to view the entire program at once, making it much easier to confirm program details compared to a standard keypad controller. Skutt KMT Kiln Controller

Programs on a KMT touchscreen can also be edited during a firing, and segments can be skipped mid-firing if desired. The touchscreen controller is also Wi-Fi enabled and can be linked to the free KilnLink app for remote temperature monitoring.

Additionally, a premium KilnLink subscription can be purchased to log firing details for better historical record-keeping and maintenance. This premium subscription can also send text or email alerts to notify the user of an error or when the kiln has reached a desired temp.


Best Skutt Kilns for Small-Scale Crystalline Firing

If the larger firing chamber of the PK series kilns is too big for your needs, a custom KM1027-3 PK can be ordered, or the smaller KMT 1018-3, KMT 822-3 or KMT 818-3 would be a good choice for low-volume crystalline firing. Any of these models can be upgraded with APM elements, Type S thermocouple, and solid-state relays. They all have a very good power-to-size ratio and will hold up well to repeated high-temperature firings. If an even smaller test kiln is needed, the GlazeTech model is the go-to kiln. It has a excellent power-to-size ratio and can be upgraded with all the options, including a mini touchscreen controller. Whatever your crystalline firing needs, Skutt has a kiln option to help you make great things.


Joshua Rysted is a Kiln Technician at Skutt, and shares a studio with his wife Martha Grover, in Maine

Share this post
Facebooktwitterpinterestlinkedintumblrmail
Orton Cone Chart - skutt.com

What is the Orton Cone Chart?  

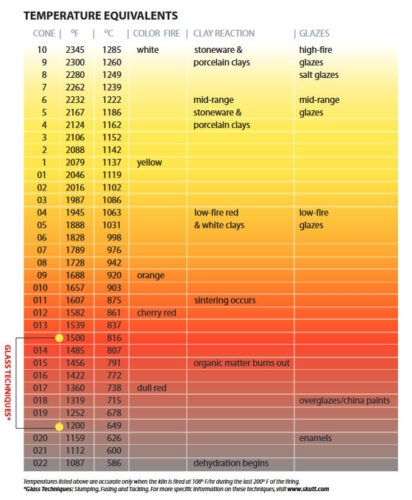
The Orton Cone Chart was developed by Edward Orton, Jr. in the late 1800s. It is based on the use of Pyrometric cones to measure heatwork in a kiln firing. Prior to their development there was no scientific means for indicating when to stop a kiln firing for optimal maturation of a clay body or glaze.  

Orton Cone Chart - skutt.com

Skilled kiln tradespeople would have to judge the heat by the color of the light emanating from holes in the kiln called bung holes (referred to as peep holes in the USA for obvious reasons). As shown in the chart below, as the temperature in the kiln rose, the color would move from red to yellow to white. 

They are composed of materials which are carefully measured and compressed into the shape of a tetrahedron. The cones are placed in the kiln on a shelf with your ware and, when they have received the proper amount of heatwork, they bend over indicating that it is time to turn off the kiln. Pyrometric Cones come in a variety of shapes and sizes. Each size and shape has a different temperature chart associated with it. The chart below is based on a Large Self-Supporting Cone and has become the standard for commercial clay bodies, glazes and controller software. All clay bodies and glazes are designed to fire to a certain cone value or range. 

It is important to know that heatwork is the measurement of the effects of time and temperature. Just like with cooking a brisket or roast, the time you take to get to temperature and the amount of time you hold at that temperature will affect the results. For example, if you heated  a brisket to the recommended 250 °F and then instantly shut off your oven, the brisket would be raw. Conversely if you brought your brisket to 250 °F and then held it there for 2 days, the brisket would be burned. The same concept holds true with ceramics. 

The cone values listed in the chart are only valid if the kiln is firing at exactly 108 °F/hr. during the last 200 °F of the firing. This ensures that time is taken into account when calculating when the kiln shuts off. If you go faster, you will underfire the ware. If you go slower, or hold to long at that temperature, the ware will be overfired. 

That is why it is very important to know the capabilities of your kiln when writing your own programs. As a kiln ages, it may begin to fire slower as the elements begin to wear out. Most controllers have a firing mode that compensates for this. In Skutt Controllers it is called ConeFire Mode. If the kiln is firing slower than 108 °F/hour it has built in algorithms that calculate a lower temperature for the kiln to shut off and thus attain the proper amount of heatwork.

We recommend that you still use Self Supporting Witness cones on every firing to monitor the accuracy of your kiln. Place the appropriate cone on a shelf approximately 2 inches from the kiln wall and two inches from the tip of the thermocouple and point the cone toward the center of the kiln chamber. Make sure the space between the thermocouple and cone is unobstructed. 

We’ve included our Skutt Orton Cone Chart as a .pdf to view, download, or print below. And if you’re interested in learning more about all things pottery, check out our ceramic blog for valuable knowledge. 


Share this post
Facebooktwitterpinterestlinkedintumblrmail
Best Kilns For School - Skutt.com

What Are The Best Kilns For Schools?

Choosing a kiln for your classroom is both exciting and a little scary. This is certainly one of the largest capital expenditures an Art Teacher will make in their career, and you want to get it right.  

We created a great document that addresses everything you need to know about choosing the right kiln. We suggest you download this Kiln Management pdf here for more detail. It even has an order sheet with signoff spaces for the Architect, Contractor, and Art Teacher to make sure everyone is on the same page. In this article we will go over the high points. 

Type of Kiln 

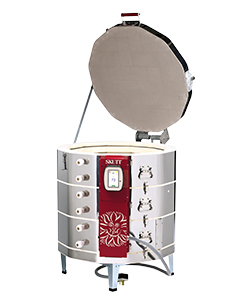
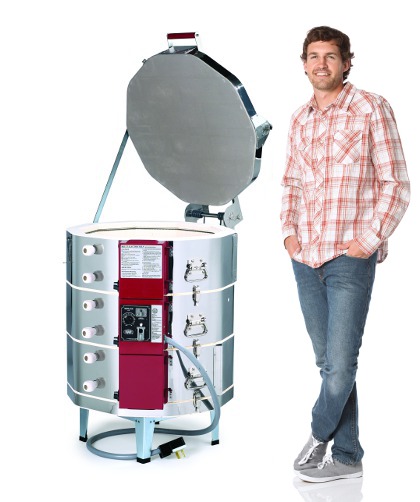
There are many styles of kilns to choose from however, most schools choose a top loading electric kiln like the one pictured here for the following reasons: Skutt KMT 1227 kiln.

  • They are the best value in terms of cost per cubic/foot. 
  • Electric kilns are easier to use and safer than gas kilns. 
  • Contrary to popular belief, they are actually easier to load than frontloading kilns because you do not have to cantilever the weight of heavy shelves away from your body which could place undo stress on your back. 
  • They have a sectional design that allows them to be easily taken apart to move through doorways and staircases. Frontloading kilns are not only much heavier, many are too large to move through standard doorways and can pose problems when trying to move them into the designated kiln room. 
  • The controllers on these kilns are designed to be intuitive and are easy to learn, even for teachers who are new to ceramics. The KMT controller pictured here has a kiosk style programming mode that walks the teacher step by step through the process. 

Size of Kiln 

The size and number of kilns needed for your school will be a direct function of how many students are in the program and the size of the projects they will be making. The most common sizes used in schools are the 10 cu/ft and 7 cu/ft models.  

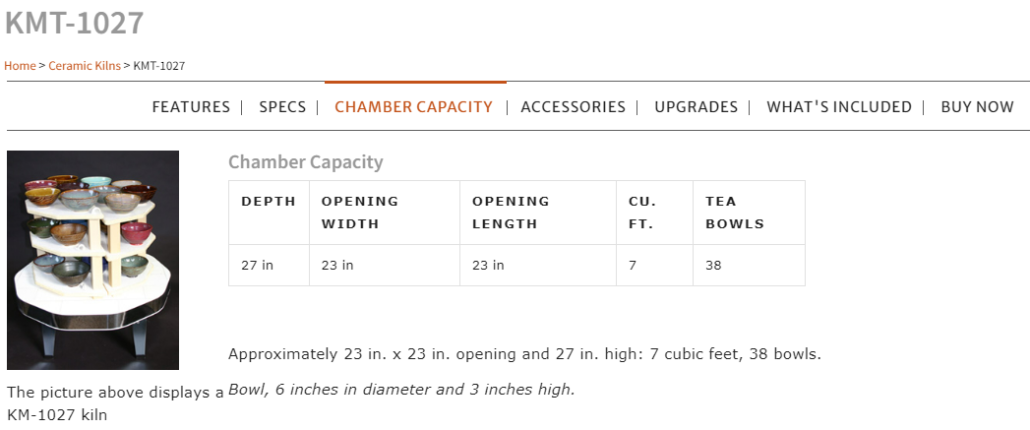
The image below from the Skutt website shows how many 6” bowls can fit in a 7 cu/ft KMT1027 kiln. For this model it is 39. A 10 cu/ft KMT1227 kiln can hold 50 6” tea bowls.  Using this image as a tool, you may determine that you will need 2 KMT1227-3 kilns to handle the ware your program of 100 students produces. If that is not in the budget you can just purchase one kiln but will need to do multiple firings. 

KMT chamber capacity.

A 6” tea bowl is a good representation of an average size of a student project. If your students are going to produce larger projects, you will need to take that into account when sizing you kiln. 

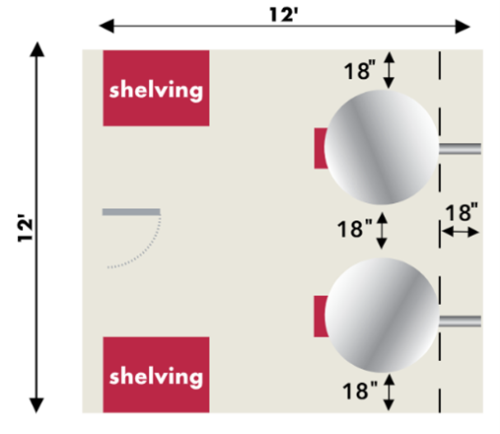
Sometimes the options for where you can locate the kiln in a school are limited. You will want to be sure the space you choose will allow for the footprint of the kiln plus, the 20” of clearance required by code. The outside measurements of all Skutt Kilns can be found at Build A Spec. 

Electrical Specifications 

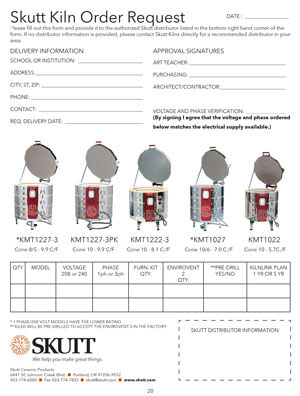
Skutt Kiln order request form image.

Ordering a kiln that does not match the electrical supply available at the school is one of the most common mistakes purchasing agents make and it is an expensive mistake. If the kiln does not match the supply it needs to be shipped back to the factory at the schools expense. Also, if it is not packed correctly in the original packaging, there is a strong likelihood that the kiln will be damaged in transport and the school would be liable for the entire cost of the kiln. 

In most schools the available supplies are: 

  • 240 Volt/1 Phase 
  • 208 Volt/1 Phase 
  • 240Volt/3 Phase 
  • 208 Volt/3 Phase 

Unlike many other electrical appliances, kilns need to be matched to the exact supply they will be hooked up to. Do not let anyone tell you 220 Volt. This is a generic term in the USA for either 208 Volt or 240 Volt. Use the form mentioned earlier in the Kiln Management document to have them sign off and verify the voltage before ordering the kiln.  

Venting 

There are basically 3 main purposes for venting: 

  • To remove heat from the room 
  • To remove fumes created by the firing process from the room 
  • To create an atmosphere inside the kiln that is beneficial to the ware 

Envirovent 2 kiln vent.

If the kiln room exceeds 100 °F the kiln is designed to shut off to protect the electronics in the controller. Most kiln rooms are equipped with an overhead vent sized by an HVAC professional to ensure the room stays below temperatures that could shut down the firing. 

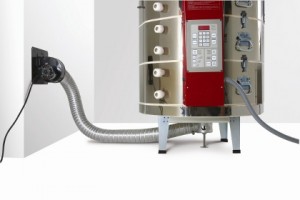
A downdraft vent like Skutt’s EnviroVent 2 is installed to take care of the fume removal and improving the chamber atmosphere. The vent is powered by a fan motor mounted to a wall which is connected to a collection cup which fits up under the kiln floor and draws air through small holes drilled in the slab. The fumes are then evacuated from the room much like a clothes dryer.  

This process brings fresh oxygen into the kiln chamber which improves combustion and helps to even out temperatures throughout the kiln.   

Accessories 

You will need a few additional kiln accessories to fire your kiln. To load ware in layers in the kiln you will need a furniture kit. This is composed of various sized refractory posts that are used to stack the shelves along with the shelves themselves. Each kiln model has it’s own recommended furniture kit with the number and size of shelves and posts matched to fit the model. 

You will also want to purchase some pyrometric cones which are used in each firing to measure the accuracy of the thermocouple and the uniformity of heat within the kiln chamber. 

Want to stay up-to-date with teacher and education-related product news and events? Sign up for our newsletter here, and make sure to check the “school teachers” email list. 

Share this post
Facebooktwitterpinterestlinkedintumblrmail
Home pottery studio setup.

How To Set Up A Home Pottery Studio

So, you have taken classes at a local teaching studio and feel that you want to take your craft to the next level or even turn it into career. What now? Most people find they not only want more convenient access to the equipment and tools used to create their work, they want to choose them. They want to create an environment that uniquely fits their style, work habits and functional needs. The obvious next step is to create a studio at home.

Home pottery studio setup.

There is a lot to consider when planning out a functional and safe home studio. In this article we will try to guide you through this process touching on the key aspects you must address:

  • Where to put your pottery studio 
  • Kiln location
  • Space considerations 
  • Aesthetics, functionality, and safety 

Where to Locate Your Studio 

Where you live will obviously affect many of these choices. Most of us do not live in palatial estates with endless option of rooms to locate our studios. Chances are, your options will be slim. The amount of space you need will be determined by: the size and volume of your work, the techniques you use to construct it, and the equipment you will require.

You may determine that locating your ideal studio in your home is not practical and decide you need to rent a commercial space to fit your needs. That’s okay. Most of the information we provide here will apply wherever you set up shop.

Since most studios will want to have a kiln, let’s start there: 

Kiln Location Considerations 

Where should I locate my kiln?

  • Kilns and other equipment need to be located inside, protected from excess moisture and heat. 
  • Kilns need to be set on non-combustible surfaces such as ceramic tile or concrete. 
  • Kilns need to be located in rooms with access to proper ventilation in order to evacuate fumes and excessive heat. 
  • Many new controllers, like Skutt’s KMT, have features (like KilnLink) that require a Wi-Fi connection to the kiln. Make sure the space you choose can be provided with a strong, dependable Wi-Fi signal.  
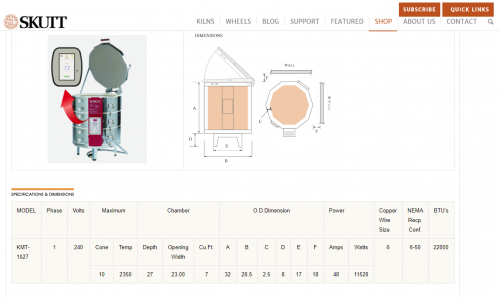
  • Kilns require 18” of clearance from any wall, other kilns, and any combustible items. Find the outside dimensions of the kiln you wish to install and add 18” of clearance around it to determine the space needed. Example: KMT1027 – Outside Width = 28.5 “ + 40” (for clearance) = 68.5”.  This is the total diameter of the space needed to place your kiln.
  • The closer you can locate your kiln to the incoming power source of your home, the less expensive the wiring will be. Make sure it is wired by a certified electrician and complies to all applicable codes. 
  • Having your kiln close to your studio is convenient for loading. If rolling carts are used to transport your wares to and from the kiln, make sure there is smooth surfaced path to avoid bumpy rides to the kiln. 
  • Allow for room nearby for storing things like kiln shelves, cones, kiln parts — anything regularly used with the kiln. 

Space Considerations 

You can use the same calculation we used above for calculating the space needed for additional items that you will need for your studio. 

  • Potter’s Wheel (don’t forget room for the stool) 
  • Wedging Table 
  • Sink (with clay trap to avoid clogs) 
  • Work Table 
  • Slab Roller 
  • Drying Rack 
  • Clay Reclaiming Station 
  • Photo Station 
  • Storage Rack, Cabinet or Closet
  • Clay 
  • Glaze 
  • Raw Materials 
  • Tools 
  • Molds 
  • Respirator 

Aesthetics, Functionality and Safety 

Hopefully you be spending a lot of time in your studio so make sure you create an environment that is pleasant and safe.

Lighting 

Good lighting is not only important to see what you are doing, it can also set a mood that inspires creativity. Natural light is great when you can get it but of course is only available during daylight hours. Directional spots with separate switch controls allow flexibility and a world of optional lighting scenarios.

Music, Wi-Fi, Refrigerator…  

Who doesn’t listen to music in the studio? You also may want an occasional snack, or stream a how to video on your iPad to learn a new technique. Be sure you have plenty of outlets for these items when planning your studio.

Floor Covering 

We all know studios are going to get dirty and also have the potential to get wet. Choose a floor covering that is waterproof, smooth and easy to vacuum or sweep. Vinyl or polished concrete are great options.

Dust Removal 

Breathing clay and glaze particles all day is not good for your long-term health. Having an overhead fan will help limit the amount of particles floating around in your studio. You may also want to invest in an air purifier as well.  

Gloves, Respirators and Sensors 

Always have non-flammable gloves available when you need to handle peep plugs or lid handles on a hot kiln. Respirators are recommended for many processes such as spraying glazes or grinding pots. Make sure you have a good one handy so you are never tempted to press on without one.

Kilns are very safe to operate in your home when installed and operated correctly. It is still recommended to install a smoke detector just as you would in any other room of your home.

For a more complete guide to all the details associated with locating, installing and maintaining kilns download the Kiln Management Guide.

Share this post
Facebooktwitterpinterestlinkedintumblrmail
Pottery wheel blog.

How To Choose A Pottery Wheel 

Choosing a pottery wheel that best fits your needs appears at first glance to be a fairly simple proposition. When you actually dig into all of the details associated with your choice it can be a little daunting. Hopefully this article will bring a little focus to the decision-making process. 

Skutt Prodigy Pottery Wheel - Red

Skutt Prodigy pottery wheel

One of the primary factors that guides every purchasing decision is price. A pottery wheel can last a lifetime if you take care of it. However, you may find that your commitment to the craft may not be as permanent. Potter’s wheels can range in price from a few hundred dollars to a few thousand. We suggest that you begin with an entry level wheel. As your throwing style evolves, you will have a better understanding of the features and specifications worth more investment.  

Entry Level Wheels 

Don’t spend too much…but don’t spend too little 

A quick Google or Amazon search will bring up wheels that cost under $500. These are basically toys for children, not serious tools to develop your craft. Many of them are cheap imports that either lack the power necessary to properly throw a pot or are of such poor quality, the will only bring frustration as they disintegrate before your eyes. 

As a general rule, stick to name brands. You should plan on spending between $800 and $2000. Also, you will want to avoid table-top models. Most people quickly advance beyond their capabilities. Your clay supplier can be an excellent resource to recommend a beginner wheel that is right for you. 

Your Forever Wheel 

Okay, so now you are hooked. You have determined that throwing pots is a passion that will last a lifetime and your skills have advanced to a level that you can appreciate the features that justify spending a little more money on a wheel. You will want to explore the following characteristics when choosing your Forever Wheel. 

  • Power 
  • Fit and Weight 
  • Wheel noise 
  • Unique Features 
  • Customer Service and Warranty 

Power – It’s All About Torque 

“Torque is a measure of the force that can cause an object to rotate about an axis.” 

When wheel manufacturers describe the power of their wheels, they generally talk in terms of horsepower (HP) or how much clay the wheel is capable of centering. These descriptions of power can be misleading and subjective. The true measure of a wheel’s power is torque.  

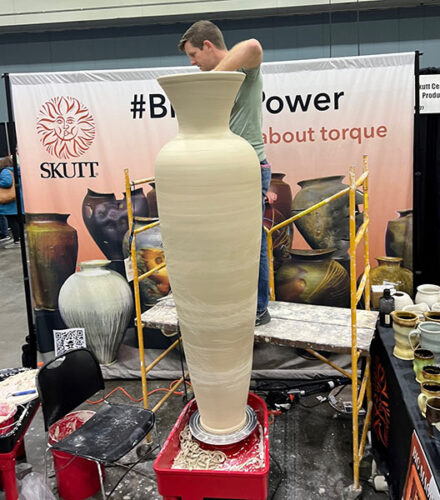
The amount of clay that can be centered on a wheel has a lot to do with the skill level of the potter. The amounts that manufacturers list in their marketing materials seem to be more dependent on what their competition is listing then any scientific measure. Herrick Smith throws a 6 foot pot on a Skutt Wheel at NCECA 2023

Motors with the same HP rating can have vastly different torque ratings depending on the type of motor and how it is assigned it’s HP rating. For example, Skutt’s continuous duty, 1/3 HP rated motor has more torque than other leading brands ½ and even 1HP models. For more information on wheel motors and power click here. 

Manufactures generally do not publish torque ratings primarily because there is no industry standard for such a measurement. This again is a good time to ask your clay supplier for advice. Chances are, if the wheel can handle the amount of clay shown in this photo, it will certainly meet your needs. 

Fit and Weight 

When we talk about “fit” we are simply talking about how comfortable you feel while throwing. Is it the right height? Do your legs fit comfortably around it? Where are your arms going to rest while throwing? The best way to find this out is to visit a distributor showroom and actually sit behind one. 

The weight of the wheel can also play an important role in how the wheel feels. Some people prefer a heavier wheel so they can use it as a brace with their legs when centering clay. Others may need to regularly move their wheel or even transport it to places other than their studio. If this is the case you may want to consider a model that is smaller or lighter. 

Noise 

Wheel noise has probably received more attention than it deserves. This attention is more a product of marketing campaigns than reality based. The bottom line is most commercial wheels on the market today are very quiet. If the quietest motor is your only criteria, you may be sacrificing other important factors like torque. 

Some potters actually prefer the wheel to make a little sound as it gives them an auditory sense of the speed of the wheel head. Normally, if a wheel is making too much noise, something is wrong with the bearing or the motor. 

The SSX controller offered by Skutt as an upgrade will significantly reduce the sound produced by the wheel motor but its primary function is to provide smoother transitions in speed especially at low RPMs.  

Unique Product Features 

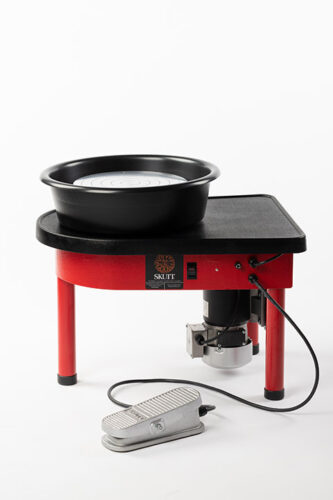
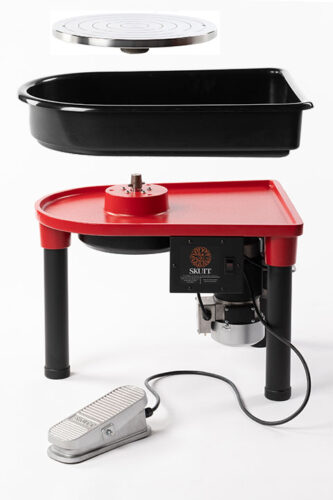
Every manufacturer offers their own set of unique features that define their brand. For example, Skutt wheels are the only wheels that come standard with an easily removeable wheel head that makes cleanup so much easier. This design also allows them to use a one-piece splash pan that will never leak and can easily be taken to the sink for cleaning or transport your trimmings without having to empty them first. For information on other unique features click here. Legend Wheel expanded

Customer Service and Warranty 

Most people do not think of service or warranties until they actually need them. Ask around to see which companies offer the best service. There is nothing more frustrating than having to go through endless phone prompts and not being able to reach an actual person. 

Research what your warranty actually covers. Some warranties seem like a good deal but when you read the small print, you are left holding the bag any many cases. Skutt is one of the few companies that will not only cover the replacement part, they also cover the labor to install it which is often times the biggest expense. Be wary of companies that prorate their warranties in the small print.

Skutt was recently able to increase its warranty period to 10 years based on the implementation of new longer lasting technology in the foot pedal.

Ready to start seeing your options? Check out Skutt’s collection of pottery wheels, and use our pottery wheel distributor locator to find where to buy a wheel closest to you. 

Share this post
Facebooktwitterpinterestlinkedintumblrmail
Home Potter With Kiln

How to Buy a Kiln for Home Use

Having access to your very own kiln changes the game for any potter. The freedom to fire your kiln when you want and how you want will bring your art to a whole new level.

  • No more risk of damage from transporting fragile bisque or incorrectly programmed kilns
  • Freedom to explore new firing effects like slow cooling or to test new glazes
  • Fire on your schedule to meet deadlines

There are number of things you need to consider before purchasing your first kiln. For this article we will only discuss the purchase of a new kiln. Used kilns can be a great option but they often come with headaches you cannot anticipate. If you would like a more comprehensive analysis of all the things needed to make an informed decision we suggest reading the publication Kiln Management. You can also use the automated web purchasing tool Build My Kiln.

Where should I locate my kiln? 

Where to locate your kiln can be a challenge and will often affect the kiln you can purchase. Ideally your location would incorporate the following considerations: Where should I locate my kiln?

  1. Must be installed on a non-combustible surface such as concrete or ceramic tile.
  2. Must be placed in an area large enough to allow 18” of clearance all around the kiln.
  3. It should be located in an area that has access to ventilation such as a room with a window, overhead fan, or allows for the easy installation of a downdraft vent.
  4. To save money, it is best to install in an area as close to the home’s electrical breaker box as possible.
  5. Place in area that is close and easily accessible from your studio.
  6. Place in area that can be protected from small children and pets.
  7. Place in area that will not over warm other living areas during summer months.

What kind of power do kilns require?

This is a big mystery for a lot of people. Here are the basics: 

Amperage

Larger kilns require a 60 Amp breaker (average electric stove runs on a 30 Amp breaker). Most newer homes have 200 Amp service and installing a new 60 Amp dedicated service is not a big deal. However, some older homes only have 100 Amp service available and it may be necessary to choose a smaller model that does not draw as much amperage.

Voltage

In the United States almost all residential have 2 voltages available, Single Phase 240 V or 120V. If you are looking at used kilns online, 3 Phase and 208V models were not work in your home. If you try and convert them the UL safety listing is no longer valid which could affect your homeowner’s insurance. Only a few very small models are available that run on 120V (like your hair dryer).

Installation

All electrical supplies should be installed by a certified electrician. Your local kiln distributor should be able to recommend one familiar with kiln installations in your area. The farther from your breaker box, the more expensive the installation will be. If the distance from the breaker box is more than 50 ft, you will be required to use a heavier gauge wire due to voltage loss. Some larger more powerful kilns do not have the option to plug in and will require direct wiring into a junction box.


What size kiln should I buy? What size kiln should I buy?

Ideally the size of your kiln will be determined by the size of the pieces you want to fire and the amount ware you need to produce. When looking at the height of the kiln chamber remember that it is recommended to post a shelf up off the floor of the kiln so you have to subtract 1” plus the thickness of the shelf you are using. In terms of width, it is recommended that you allow 1” of clearance from the elements so subtract 2” from the total width.

What kiln accessories will I need?

At the very minimum you will need a furniture shelf/post kit to load your ware efficiently. It is also highly recommended to install a downdraft ventilation system (like the EnviroVent 2 from Skutt). This vents fumes directly from the kiln chamber to the outdoors. This not only prevents you from stinking up your house, it also improves firing results and prolongs the life of your kiln. Other popular accessories include: rolling kiln stands, EnviroLink (automatically turns on vent when kiln is started) and extra shelves.

What kiln upgrades should I consider? KMT Controller

If you are going to spend money on any upgrade,  it should be the touchscreen controller (KMT Controller models from Skutt). This is a no brainer. These new controllers utilize the newest technology to make your firing experience more intuitive. They have a kiosk style programming mode that walks you step by step though the firing process with confidence. With an interface much like a smart phone the controller can display messages in full sentences instead of cryptic 4 digit characters. It also comes with a free App that allows you to monitor your kiln status from your smart phone. 

Where should I purchase my kiln?

We always suggest you support your local clay suppliers. They can provide services that online distributors cannot. Often times you can see the actual kiln you are purchasing on their showroom floor. Here are some of the services you may be smart to utilize:

  • Receiving from the factory and inspecting for freight damage
  • Delivery to your home and professional set up (they will also haul away all the packing material)
  • Testing
  • Programming and Maintenance Training

Of course if you do not have a local distributor there are many online distributors that do an excellent job at walking you through the buying process. You can count on all distributors to give you an unbiased and informed recommendation as to which model and brand which suits you best. Here is link to help guide you in selecting a quality provider: Find a distributor.

Share this post
Facebooktwitterpinterestlinkedintumblrmail

Kiln Room Wiring

Now that you’ve confirmed your power supply with an electrician and ordered your kiln from your local distributor (https://skutt.com/shop/distributor-locator/), it’s time to get the wiring installed. 

When the electrician comes to your home to install the wiring and receptacle for your kiln, you should inform him or her of the following important information recommended for your kiln:

  • Copper wire gauge
  • Receptacle style
  • Location of outlet
  • Circuit breaker size

It is important to hire a licensed and qualified electrician to install the recommended wiring components for your new kiln.  It is also critical for your electrician to know that the kiln voltage must match the voltage at your home.  Kilns are not like many other electrical appliances or motors that the electrician is familiar with.  Kilns will typically not operate properly on a range of power supplies like other appliances are able to.  The voltage at your home should be measured at within +/- 3% of the kiln’s rated voltage.  For example, if the kiln is wired for 240 volts, it is designed to work properly on supplied voltage that is between 232-247 volts. 

Two of the most common kiln firing problems that we encounter are related to mismatched voltage between the kiln and the building.  The first situation is under-supplied voltage: a 240-volt kiln firing on a 208-volt supply.  Because 240-volt kilns are quite common, this can be a problem at many schools if the power supply was not confirmed before the kiln was purchased.  In this scenario, the kiln will be constantly underpowered and struggle to reach high temps (cone 5-10).  It will be able to reach lowfire glaze and bisque temps (cone 06-04), but it will take longer than normal because the kiln is not receiving the full amount of voltage for which the elements were designed. 

The second scenario is far more dangerous than the first.  It involves a 208-volt kiln being fired on a 240-volt supply.  We see this more commonly if someone buys a used kiln from a school and installs it at home, or sometimes if a kiln is moved from one industrial location to another and the locations do not have matching power supplies.  Just because both locations are commercial does not mean they have the same power supply.  Don’t assume.  Always get it checked out in advance.  The problem in this scenario is that the kiln will be overpowered and that extra voltage will damage the kiln.  The 208-volt kiln is designed to run on 202-214 volts (+/- 3%).  When it receives 240 volts, that is a 15% overage, and that is enough to burn out the elements and damage the relays and even the computer controller. 

You can easily avoid all of these problems by confirming that the power supply at your location matches your kiln.  If there is a mismatch, often the easiest and least expensive way to correct the problem is to install a new set of the appropriate voltage elements.  The elements are the only difference between kilns wired for 208 volts and 240 volts*. 

*Please review the maximum firing temperature if you are converting the voltage of the kiln.  In some cases, the max temp will be reduced.  Additionally, please note that there are other wiring changes if you have a mismatch in phase (1 vs. 3) between your power supply and kiln.  Contact technical support for more information about either of these situations. 

You can use the Skutt Build-A-Spec tool (https://skutt.com/shop/build-a-spec/) to create a printable page to give to the electrician that will detail all of the important information for them to know about your kiln.

For instance, if the power supply at your home is single phase, 240 volts, and you chose the model KM-1027-3 kiln, then you would need to inform the electrician of the following requirements supplied by the Build-A-Spec tool:

  • 6 gauge COPPER wire (it is very important that it is copper and not aluminum)
  • NEMA 6-50 receptacle
  • 48-amp draw will require a minimum of a 50-amp circuit breaker (and in some cases 60)


Wiring Gauge

The gauge (thickness) of the wire is important so that it is sufficiently sized to handle the flow of electricity for the kiln.  If it is too small, the wire will get hot and could be a fire hazard.  There is no problem with the wire being over-sized, other than the added expense.  It is also important that the wire is made of copper and not aluminum.  Aluminum wires cost less than copper, but they have some distinct disadvantages.  Aluminum wires expand more than copper, they corrode, and they can’t handle as much amperage as a similarly sized copper wire.  Aluminum is a good conductor of electricity, but it is not as good as copper.  When electricity is flowing through an aluminum wire, the wire heats up a tiny bit.  When it heats up, it expands and then contracts when it cools.  This expanding and contracting movement has the effect of loosening wire connections over time.  Loose connections can come undone and become a fire hazard.  The connections can be re-tightened, but that requires additional maintenance and diligence to inspect those connections annually.  Aluminum wire also corrodes differently than copper when exposed to air.  Anywhere the insulation has been stripped off the aluminum wire, anti-oxidant coating should be applied, otherwise a white “rust” will develop.  This oxidation is not a good conductor of electricity.  It creates resistance and therefore heat, which is never a good thing in electrical wiring.  Copper, on the other hand, oxidizes very slowly but even that minimal oxidation is not detrimental because it is still a good conductor of electricity.  The final concern relates to the size of the wire (gauge).  Aluminum wires are not rated to carry the same number of amps as an equivalently sized copper wire.  From the example above, our KM-1027-3 kiln needs a 6-gauge wire because it draws 48 amps.  A 75°C, 6-gauge copper wire is rated for 65 amps, but a 75°C, 6-gauge aluminum wire is only rated for 50 amps.  The aluminum wire in this scenario would easily be maxed out, but the copper wire can handle the full load with ease.  To get the same amperage rating, the aluminum wire needs to be over-sized, which begins to negate the cost savings compared to copper, but you still have the other problems.  Stick with copper all the way. 

There are a few other circumstances that can affect which gauge wire needs to be installed at your location.  In all cases, any variation will be to install a thicker gauge wire than what is recommended, never thinner.  If the distance from your circuit breaker to the kiln is more than 50 feet, then you should typically install heavier gauge wiring (generally 2 sizes larger for every 50 feet of wire run) to minimize a low voltage condition to the kiln.  Additionally, using cable type circuit wiring (vs. individual wires in a conduit), or connecting to older type electrical equipment (60⁰C, vs. 75⁰C or 90⁰C), or installing in higher ambient temperature locations (hot attic) may require using a heavier gauge wire size.  Consult an electrician for your particular installation requirements. 

On a side note, if you are installing a smaller kiln but have reasonable intentions to install a larger kiln in the near future, it would be wise to consider installing larger gauge wire to begin with.  It will cost a little bit more, but you will not have to pull it out later on and run new wires if you want to install a larger kiln in the future.  A larger kiln may require a different sized circuit breaker and receptacle, but those can often be changed more easily than running new wires in the wall. 

 
Kiln receptacle style and location

Staying with our KM-1027-3 example, the Build-A-Spec tool lists a NEMA 6-50 receptacle.  This is the designation for what type of receptacle will match up with the plug on the end of the kiln’s power cord.  NEMA is the National Electrical Manufacturers Association, and they have designations for every plug and matching receptacle organized by maximum amperage ratings.  Skutt uses a limited number of plugs on the kilns we manufacture, but there are a variety of other plugs available for many other uses.  It is advised to not alter the original plug on your kiln, and, in some cases, it could void your kiln warranty. 

The installation location of your receptacle should be to the right of your kiln (from your perspective if you were facing the front of the kiln) and raised up about 18” off the floor.  The ground plug (round hole) on the receptacle should be at the top.  This orientation allows the power cord to hang down so that there is not any added stress on the connections when the kiln is plugged in. 

The kiln power cord is 6 feet long.  It is important that when the kiln is plugged in the power cord should not rest on the body of the kiln (it could get hot and melt) and should not be extended so far that the plug is stressed when inserted in the receptacle.   

If your kiln does not list a receptacle style, but instead indicates that your kiln is “direct wire” this means that the kiln is large enough and/or draws a significant amount of power that it cannot safely be plugged in conventionally.  The power cord from the kiln will be wired directly to a small box called a shut-off switch.  This box has an “on/off” lever that disconnects power to the kiln.  The box will be located on the wall where a traditional outlet would normally be installed.  The shut-off switch is then wired to the main circuit breaker panel in the same fashion as any other receptacle would be. 

Circuit Breaker

The final component that the electrician will need to install is a circuit breaker dedicated to your kiln.  The Build-A-Spec tool lists the maximum amperage draw for every kiln model.  The electrician can use that information to size the circuit breaker accordingly for your installation.  It is generally advised to have a circuit breaker that is 20% larger than the maximum draw that will be placed on it. 

Ideally, the circuit breaker panel should be visible from the kiln (located in the same room or very near by), so that power can be easily shut off to the kiln when needed.  If the circuit breaker panel is located far away in another part of the building, then the kiln should be direct wired to a shut-off switch. 

Additional Wiring Considerations

In addition to the special wiring just for your kiln, it will be useful to have access to a few standard 120-volt outlets near your kiln.  These are necessary if you will be installing an EnviroVent 2 kiln vent or just need to plug in an extra light or a box fan for room ventilation. 


In our next blog, we will review kiln room setup.

Share this post
Facebooktwitterpinterestlinkedintumblrmail
cruise control

What is IR Comp and Why Should I Care?

The best analogy for IR Compensation is the Cruise Control on your car. When you want to keep your car speed at a specific MPH you set your cruise control. When you come to a hill your car needs more power to climb the hill so your Cruise Control gives it the right amount of gas to keep the speed constant while climbing the hill.
Most potters wheels have the same feature but it has a much less sexy name, IR Compensation. the “I” refers to current and the “R” refers to armature resistance. The adjustment is hidden in your wheels control box on the controller’s circuit board along with settings for speed control and torque. Manufacturers don’t like you messing with these settings because they are generally “tuned” to the size of your motor, pulley, belt… you get the picture.

So, to use the analogy: your wheel is the car, IR Comp. is the cruise control, Amperage is the fuel, the force you put on your wheel while throwing (especially centering) is the hill and the foot pedal is… well the foot pedal and the motor is the motor. Now I personally do not like using Cruise Control in a hilly area. That is primarily be-cause I have mostly owned small engine vehicles where I have to slam the gas pedal to the floor to get up hills and when I let cruise control try and do this it gets a little jolty (not sure if jolty is a word but I think you all know what I mean).

The bigger the engine (motor) and the smaller the hill (pressure on the wheel head), the less dramatic the joltyness (can I trademark that word?). A few more things come into play like the sophistication of the controller and the degree of IR Comp employed, but let’s get back to that later.

So, if I am driving an old VW Bug that needs a tune up and you are in a brand new 12 Cylinder engine Jaguar and we hit the same hill, I am going to slam my pedal to the floor boards while you barely have to move your foot. In other words, the adjustment is subtle because it is not putting much strain on your huge motor. This is probably why they never put cruise control on VW bugs. It would probably pop the seat right off the rails.

Okay, so what does this have to do with throwing pots? For most people, not much. For people throwing very large pots and for people throwing very thin, wide bowls at low speeds, it can be the difference between success and failure. Imagine you are dropping the walls on a 3 ft. diameter, razor thin, platter and the wheel gets a little unexpected jolt when the IR Comp kicks in.

Let’s face it, your foot pressure could be less smooth then the IR Comp so what is the solution? Buy the Jaguar with the 12 cylinder engine and never set your cruise control. In Skutt terms, get the wheel with the biggest motor you can afford and don’t worry about IR Comp because we never turn it on.

The founder of Thomas Stuart wheels, now Skutt Wheels, was a big pot potter. When he designed the wheels he specifically chose a motor that was strong enough to maintain a consistent wheel head speed, while the wheel was turning slowly, subjected to the resistance created by the weight of a lot of clay and without having to incorporate IR Comp.

So let’s get back to controllers. If you are not going to use IR Comp you are going to occasionally have to put your foot down on the gas to maintain wheel head speed. When you do this you want the power to be delivered as smoothly as possible. Think of the SSX Controller upgrade like replacing your carburetor with an electronically controlled fuel injector.

The SSX controller has more sophisticated and robust components. One of the most important of these components is it’s large capacitor. A capacitor stores energy much like a battery. Having this stored energy allows you to feather in the power when you needed it more precisely and therefor results in a smoother transition at low speeds.

For 99% of the potters out there, our 1/3 HP motor with the standard controller is perfectly satisfactory for their needs. Unless you are working with a wheel every day, making challenging pieces, you probably will not even notice the difference of any of these factors we just discussed. So, save your money for clay and just concentrate on whether you want a built-in splash pan or a removable splash pan. We will talk about that in future Blog Posts.

Share this post
Facebooktwitterpinterestlinkedintumblrmail
hot keys

Ceramic Hot Keys

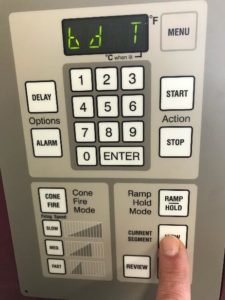
hotIf you own a Skutt Kiln with a KilnMaster Controller you may only be using a fraction of the features available to you. Some of the coolest features are accessed while the kiln is firing. We call these Hot Keys. Most of these give you diagnostic information that is helpful troubleshooting your kiln or just gain better insight into the actual performance during the firing. Below is a list of the Hot Keys and their functions on newer KilnMaster Controllers (ones with green display lights):

1, 2 and 3

Skutt Ceramic Kiln Hot KeysThese keys will display the temperature reading of the corresponding thermocouple on a Zone Control Kiln. Zone Control is an optional upgrade available that places a thermocouple in each section of the kiln. This allows the controller to sense when one section of the kiln is firing too hot or too cold and make adjustments during the firing.

In a 3 section kiln, the one key will display the temperature in the top section, 2 will display the middle, and 3 will display the bottom. The controller must be configured for Zone control for these keys to work.

5

The five key will display the programmed rate of rise in degrees per hour for the active segment in the program.

7

The seven key will perform an Amp check and then continue the firing. It will temporarily stop the program, turn each relay on individually and give you the amp reading. Once all the relays have been cycled on it will continue the firing. A list of the desired amp readings for each model can be found under the Library tab on the Skutt website under troubleshooting.

Each Amp reading represents a section of the kiln starting from the top. If your kiln only has two sections the 3 reading will be zero. If one of the sections that does exist comes back with a reading of Zero, chances are likely you have a relay out. If it is reading low, it may be an indication that your one or more of the elements in that section are starting to wear out. It is a little more complicated than that so if you want a complete description on how to accurately interpret the results read the white paper on Interpreting Diagnostics under the Library Tab of the website.

8

The eight key will flash 3 decimal points representing the outputs on the control board. The outputs are what tell the relays to turn on. The one on the left will represent the top section of the kiln, the middle represents the middle section and the one on the right represents the bottom section.

This is a very complex troubleshooting tool and almost always needs to be used in conjunction with other tests to gain useful information. Most likely this test will be initiated at the request of a Skutt Technician.

0

The zero key will tell you the elapsed time since the kiln was started. This can help you estimate when to be there for the ending of the program.

View

The View key will tell you what segment of a program the controller is currently running. It will also tell you what we call the “traveling set point” and the temperature of the circuit board. The traveling set point is the temperature where the kiln is supposed to be if it were keeping up with the program.

Just because you program a kiln to fire at a particular rate to a temperature does not necessarily mean it is capable of achieving that rate. It will only do the best it can. This diagnostic feature allows you to see the actual performance. Again this feature requires advanced troubleshooting skills to extract meaningful data and will most likely be interpreted by a Skutt Technician.

The Board Temperature is a very useful in determining if your kiln room is properly ventilated. It’s kind of hard to believe that the room temperature could have much impact on the temperature of the circuit board when it is sitting so close to a kiln chamber that is 2350F, but it does.

If the board temperature reaches 160F the kiln will shutoff to avoid damaging the controller. We calculate that if the room air exceeds 100F while the kiln is firing you run the risk of getting an “E-bd” error and the kiln shutting off. Often times a fan blowing on the controller is enough to prevent this from occurring.

One last feature accessed through the view key is “skip step”. This will advance any program to the next segment in the program. To activate skip step press View then ENTER and ENTER again.

Review

Review is generally used prior to pressing Start to ensure you have entered the correct program but it can also be pressed while the kiln is firing just in case you are second guessing yourself (or someone else who may have programed the kiln).

Share this post
Facebooktwitterpinterestlinkedintumblrmail