
Kiln Room Wiring
Now that you’ve confirmed your power supply with an electrician and ordered your kiln from your local distributor (https://skutt.com/shop/distributor-locator/), it’s time to get the wiring installed.
When the electrician comes to your home to install the wiring and receptacle for your kiln, you should inform him or her of the following important information recommended for your kiln:
- Copper wire gauge
- Receptacle style
- Location of outlet
- Circuit breaker size
It is important to hire a licensed and qualified electrician to install the recommended wiring components for your new kiln. It is also critical for your electrician to know that the kiln voltage must match the voltage at your home. Kilns are not like many other electrical appliances or motors that the electrician is familiar with. Kilns will typically not operate properly on a range of power supplies like other appliances are able to. The voltage at your home should be measured at within +/- 3% of the kiln’s rated voltage. For example, if the kiln is wired for 240 volts, it is designed to work properly on supplied voltage that is between 232-247 volts.
Two of the most common kiln firing problems that we encounter are related to mismatched voltage between the kiln and the building. The first situation is under-supplied voltage: a 240-volt kiln firing on a 208-volt supply. Because 240-volt kilns are quite common, this can be a problem at many schools if the power supply was not confirmed before the kiln was purchased. In this scenario, the kiln will be constantly underpowered and struggle to reach high temps (cone 5-10). It will be able to reach lowfire glaze and bisque temps (cone 06-04), but it will take longer than normal because the kiln is not receiving the full amount of voltage for which the elements were designed.
The second scenario is far more dangerous than the first. It involves a 208-volt kiln being fired on a 240-volt supply. We see this more commonly if someone buys a used kiln from a school and installs it at home, or sometimes if a kiln is moved from one industrial location to another and the locations do not have matching power supplies. Just because both locations are commercial does not mean they have the same power supply. Don’t assume. Always get it checked out in advance. The problem in this scenario is that the kiln will be overpowered and that extra voltage will damage the kiln. The 208-volt kiln is designed to run on 202-214 volts (+/- 3%). When it receives 240 volts, that is a 15% overage, and that is enough to burn out the elements and damage the relays and even the computer controller.
You can easily avoid all of these problems by confirming that the power supply at your location matches your kiln. If there is a mismatch, often the easiest and least expensive way to correct the problem is to install a new set of the appropriate voltage elements. The elements are the only difference between kilns wired for 208 volts and 240 volts*.
*Please review the maximum firing temperature if you are converting the voltage of the kiln. In some cases, the max temp will be reduced. Additionally, please note that there are other wiring changes if you have a mismatch in phase (1 vs. 3) between your power supply and kiln. Contact technical support for more information about either of these situations.
You can use the Skutt Build-A-Spec tool (https://skutt.com/shop/build-a-spec/) to create a printable page to give to the electrician that will detail all of the important information for them to know about your kiln.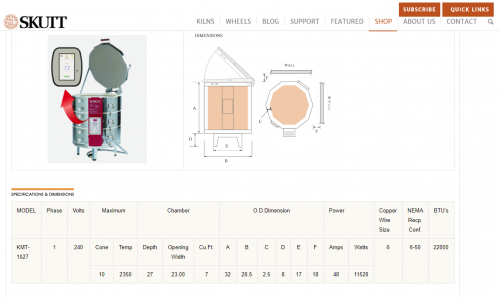
For instance, if the power supply at your home is single phase, 240 volts, and you chose the model KM-1027-3 kiln, then you would need to inform the electrician of the following requirements supplied by the Build-A-Spec tool:
- 6 gauge COPPER wire (it is very important that it is copper and not aluminum)
- NEMA 6-50 receptacle
- 48-amp draw will require a minimum of a 50-amp circuit breaker (and in some cases 60)
Wiring Gauge
The gauge (thickness) of the wire is important so that it is sufficiently sized to handle the flow of electricity for the kiln. If it is too small, the wire will get hot and could be a fire hazard. There is no problem with the wire being over-sized, other than the added expense. It is also important that the wire is made of copper and not aluminum. Aluminum wires cost less than copper, but they have some distinct disadvantages. Aluminum wires expand more than copper, they corrode, and they can’t handle as much amperage as a similarly sized copper wire. Aluminum is a good conductor of electricity, but it is not as good as copper. When electricity is flowing through an aluminum wire, the wire heats up a tiny bit. When it heats up, it expands and then contracts when it cools. This expanding and contracting movement has the effect of loosening wire connections over time. Loose connections can come undone and become a fire hazard. The connections can be re-tightened, but that requires additional maintenance and diligence to inspect those connections annually. Aluminum wire also corrodes differently than copper when exposed to air. Anywhere the insulation has been stripped off the aluminum wire, anti-oxidant coating should be applied, otherwise a white “rust” will develop. This oxidation is not a good conductor of electricity. It creates resistance and therefore heat, which is never a good thing in electrical wiring. Copper, on the other hand, oxidizes very slowly but even that minimal oxidation is not detrimental because it is still a good conductor of electricity. The final concern relates to the size of the wire (gauge). Aluminum wires are not rated to carry the same number of amps as an equivalently sized copper wire. From the example above, our KM-1027-3 kiln needs a 6-gauge wire because it draws 48 amps. A 75°C, 6-gauge copper wire is rated for 65 amps, but a 75°C, 6-gauge aluminum wire is only rated for 50 amps. The aluminum wire in this scenario would easily be maxed out, but the copper wire can handle the full load with ease. To get the same amperage rating, the aluminum wire needs to be over-sized, which begins to negate the cost savings compared to copper, but you still have the other problems. Stick with copper all the way.
There are a few other circumstances that can affect which gauge wire needs to be installed at your location. In all cases, any variation will be to install a thicker gauge wire than what is recommended, never thinner. If the distance from your circuit breaker to the kiln is more than 50 feet, then you should typically install heavier gauge wiring (generally 2 sizes larger for every 50 feet of wire run) to minimize a low voltage condition to the kiln. Additionally, using cable type circuit wiring (vs. individual wires in a conduit), or connecting to older type electrical equipment (60⁰C, vs. 75⁰C or 90⁰C), or installing in higher ambient temperature locations (hot attic) may require using a heavier gauge wire size. Consult an electrician for your particular installation requirements.
On a side note, if you are installing a smaller kiln but have reasonable intentions to install a larger kiln in the near future, it would be wise to consider installing larger gauge wire to begin with. It will cost a little bit more, but you will not have to pull it out later on and run new wires if you want to install a larger kiln in the future. A larger kiln may require a different sized circuit breaker and receptacle, but those can often be changed more easily than running new wires in the wall.
Kiln receptacle style and location
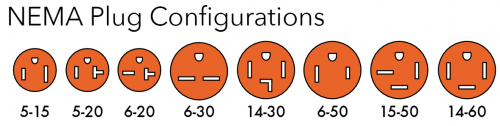 Staying with our KM-1027-3 example, the Build-A-Spec tool lists a NEMA 6-50 receptacle. This is the designation for what type of receptacle will match up with the plug on the end of the kiln’s power cord. NEMA is the National Electrical Manufacturers Association, and they have designations for every plug and matching receptacle organized by maximum amperage ratings. Skutt uses a limited number of plugs on the kilns we manufacture, but there are a variety of other plugs available for many other uses. It is advised to not alter the original plug on your kiln, and, in some cases, it could void your kiln warranty.
The installation location of your receptacle should be to the right of your kiln (from your perspective if you were facing the front of the kiln) and raised up about 18” off the floor. The ground plug (round hole) on the receptacle should be at the top. This orientation allows the power cord to hang down so that there is not any added stress on the connections when the kiln is plugged in.
The kiln power cord is 6 feet long. It is important that when the kiln is plugged in the power cord should not rest on the body of the kiln (it could get hot and melt) and should not be extended so far that the plug is stressed when inserted in the receptacle.
If your kiln does not list a receptacle style, but instead indicates that your kiln is “direct wire” this means that the kiln is large enough and/or draws a significant amount of power that it cannot safely be plugged in conventionally. The power cord from the kiln will be wired directly to a small box called a shut-off switch. This box has an “on/off” lever that disconnects power to the kiln. The box will be located on the wall where a traditional outlet would normally be installed. The shut-off switch is then wired to the main circuit breaker panel in the same fashion as any other receptacle would be.
Circuit Breaker
The final component that the electrician will need to install is a circuit breaker dedicated to your kiln. The Build-A-Spec tool lists the maximum amperage draw for every kiln model. The electrician can use that information to size the circuit breaker accordingly for your installation. It is generally advised to have a circuit breaker that is 20% larger than the maximum draw that will be placed on it.
Ideally, the circuit breaker panel should be visible from the kiln (located in the same room or very near by), so that power can be easily shut off to the kiln when needed. If the circuit breaker panel is located far away in another part of the building, then the kiln should be direct wired to a shut-off switch.
Additional Wiring Considerations
In addition to the special wiring just for your kiln, it will be useful to have access to a few standard 120-volt outlets near your kiln. These are necessary if you will be installing an EnviroVent 2 kiln vent or just need to plug in an extra light or a box fan for room ventilation.
In our next blog, we will review kiln room setup.


Leave a Reply
Want to join the discussion?Feel free to contribute!