Roberto Lugo Inspired Portrait Pots
Meet The Teacher: Amy Shapiro
I am a lucky individual to be working in an area that I truly love: Ceramics! I have been working in clay since I was 5 years old, but didn't officially fall in love with it until college. It was there I decided to continue into education as a way to share my love of teaching and knowledge of working in clay.
Project Description
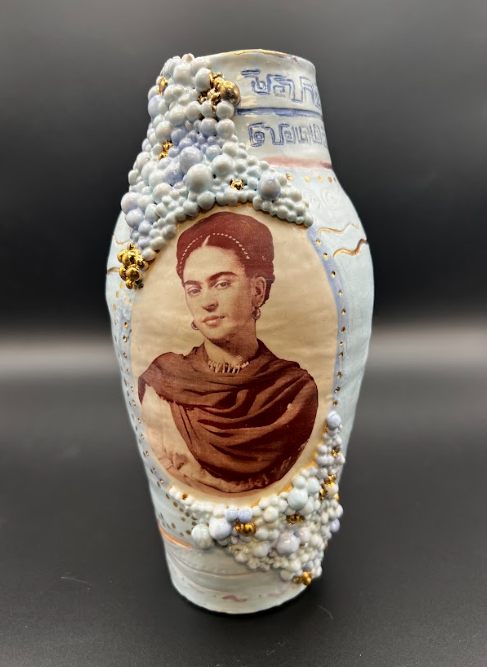
In this unit, students draw inspiration from contemporary ceramic artist Roberto Lugo to create personalized coil pots dedicated to influential individuals in their lives. The project involves advanced techniques such as underglazing, glazing, and gold luster accents across multiple firings.
Materials
- Clay (We use mid-fire, but any temperature can be adapted for this unit)
- Assorted Underglazes
- Clear Glaze
- Assorted Colored Glazes (optional)
- Assorted brushes, including thin liner brushes
- “Fired-on-Images” Laser Printer Decal Paper (Can be substituted with paper decoupage)
- Gold Luster Overglaze (Optional, can be substituted with gold paint marker)
Grade Level
High School
Difficulty
Advanced
Student Hands-On Time
23 days of 50 min. periods.
Teacher Prep Time
4 hours
Project Cost / Cost Per Student
6
National Core Arts Standards - Visual Arts
- Creating - Generate and conceptualize artistic ideas.
- Creating - Organize and develop artistic work.
- Creating - Conceiving and developing new artistic ideas and work.
- Presenting - Select, analyze, and interpret works for presentation.
- Presenting - Develop skills for artistic presentation and exhibition.
- Responding - Perceive and analyze artistic work.
- Responding - Interpret intent and meaning in artwork.
- Responding - Evaluate and critique based on aesthetic and technical qualities.
- Connecting - Relate artistic ideas to historical, cultural, and social contexts.
- Connecting - Connect personal experiences with artmaking and meaning.
21st Century Skills
- Critical Thinking & Problem-Solving
- Creativity & Innovation
- Communication
- Collaboration
- Initiative & Self-Direction
- Social & Cross-Cultural Skills
- Productivity & Accountability
STEAM Education
- Arts
Differentiations and Accommodations
Differentiation
Struggling Learners
Accommodation
Support for Social-Emotional LearningEncourage student choice and personal voice to increase engagementFoster a respectful critique environment where all perspectives are valuedProvide positive, growth-focused feedback to build confidence and resilience
Differentiation
Struggling Learners
Accommodation
English Language Learners (ELL):Use visual vocabulary cards (coil, score, slip, glaze, etc.)Provide sentence frames for critiques and artist statementsIncorporate demonstrations and modeling over text-heavy instruction
Differentiation
Advanced Learners
Accommodation
Advanced/Gifted Students:Encourage deeper conceptual exploration of identity and cultural themesIntroduce advanced techniques (complex forms, surface layering, luster application)Require more sophisticated artist statements and research connections
Differentiation
IEP
Accommodation
Content DifferentiationProvide visual exemplars (finished samples, step-by-step images) to support visual learnersOffer simplified design options (e.g., fewer coils, smaller scale, pre-drawn templates) for students needing additional supportExtend learning with advanced options such as more complex forms, layered symbolism, or mixed media elementsProcess DifferentiationScaffold instruction with chunked demonstrations (coil building → joining → smoothing → surface design)Provide guided notes or checklists for multi-step processesAllow flexible pacing for students who need additional time for construction or refinementOffer one-on-one or small group instruction for targeted skill supportProduct DifferentiationAllow varied levels of complexity in final projects (basic form vs. highly detailed narrative surfaces)Provide alternative ways to demonstrate understanding (written reflection, verbal explanation, recorded presentation)Adjust expectations for size, detail, or number of techniques based on student readinessLearning EnvironmentCreate a structured and predictable studio routine to support all learnersProvide clearly labeled materials and visual instructions in the workspaceOffer preferential seating or workspace adjustments as needed (e.g., proximity to teacher, larger work area)
Differentiation
504 Accommodations
Accommodation
Students with 504 Plans:Extended time for building and finishing workModified tool use or adaptive tools for fine motor supportReduced workload or simplified steps while maintaining core objectives
Learning Objectives: Knowledge
At the conclusion of this unit, students should be able to…Create a vertically oriented coil pot that demonstrates structural integrity and craftsmanship through proper construction techniques.Apply ceramic surface techniques such as incising, underglaze painting, and glazing to enhance visual storytelling.Design and incorporate a portrait and symbolic imagery that communicates aspects of personal or cultural identity.Analyze how artists (such as Roberto Lugo) use form, imagery, and text to express identity and social themes.Synthesize research and personal experiences to develop original artistic concepts.Evaluate their own artwork and the work of peers using criteria such as craftsmanship, creativity, and conceptual meaning.Articulate, verbally and in writing, how their finished piece reflects their identity and artistic choices.
Learning Objectives: Skills
At the conclusion of this unit, students should be able to…Construct a stable coil-built ceramic form using proper techniques (consistent coils, secure joins through scoring and slipping).Control form and proportion to successfully build a vertically oriented vessel (8”–15”) that maintains structural integrity.Demonstrate effective smoothing and blending techniques to refine the surface and unify coils where appropriate.Apply surface techniques such as incising, carving, and adding low-relief details to enhance visual interest.Create and prepare a surface area suitable for imagery (portrait application, painting, or decals).Demonstrate control and intentional use of underglaze for clean, purposeful design and imagery.Apply glaze correctly, including even coverage, appropriate thickness, and clean foot rings.Understand and follow the multi-step firing process (greenware → bisque → glaze firing).Safely and effectively use ceramic tools and materials (needles, ribs, scoring tools, brushes, etc.).Maintain craftsmanship by preventing common issues (cracking, collapsing, uneven thickness).Demonstrate proper studio habits, including cleanup, storage, and care of work throughout the drying and firing process.
Learning Objectives: Attitudes/Values
At the conclusion of this unit, students should be able to…Demonstrate persistence and resilience when working through challenges in the ceramic process (e.g., construction issues, cracking, glazing outcomes).Value craftsmanship by taking pride in the care, effort, and quality of their work.Show openness to exploring and expressing personal identity through art in meaningful and thoughtful ways.Respect diverse perspectives and cultural identities as expressed in their own work and the work of others.Engage in constructive critique by giving and receiving feedback with respect and a growth mindset.Take responsibility for materials, tools, and studio space, demonstrating safe and ethical studio habits.Appreciate the role of historical and contemporary artists in shaping conversations about identity and culture.Develop confidence in their artistic voice and decision-making.Embrace risk-taking and creative experimentation as part of the artistic process.Reflect honestly on their artistic growth, strengths, and areas for improvement.
Formative Assessment
Teacher Checklists and Annotated Notes: (Blank Student Spreadsheet) *Tile Completion *Base+3 Coils *Completed Build *Underglaze Completion *Glazing Completion *Image Transfer Completion *Gold Luster CompletionSketch SheetProgress Image Uploads into Work In Progress AssignmentsStudent Reflective Questions
Summative Assessment
Rubric for Completed Coil PotRubric for Completed Artist Statement
Reflection and Discussion
Personal ReflectionWhat part of your identity did you choose to represent in your piece, and why? What artistic choices (imagery, symbols, text, color) best communicate your message? What challenges did you face during the process, and how did you overcome them? If you could change one part of your work, what would it be and why? What did you learn about yourself through this project?Process Reflection How did your idea evolve from your initial concept to your final piece? What techniques were most successful for you? Which were most difficult? How did working with clay influence your design decisions? What problem-solving strategies did you use when things didn’t go as planned?Peer DiscussionWhat is the first thing you notice about this piece, and what draws your attention? What story or message do you think the artist is communicating? How do the form and surface design work together to support the idea? What is one strength of this piece? What is one suggestion for improvement?Connection to Artists & ThemesHow does your work relate to the ideas explored by Roberto Lugo? How can ceramics be used to communicate identity, culture, or social issues? Why might artists choose functional objects to tell personal or political stories?Group Discussion / Whole-Class DialogueWhat common themes about identity emerged across the class’s work? How did different students approach the idea of identity in unique ways? What did you learn from seeing and discussing others’ artwork? How can art help us better understand each other’s experiences and perspectives?Closing ReflectionHow has your understanding of art and identity changed through this unit? What skills or ideas will you carry into your next project?
Lesson Activities
Day 1 – Introduction to Unit
Day 1 – Introduction to Unit Instruction (15 min): Intro to unit + view/discuss work by Roberto Lugo Hands-On (20 min): Identity brainstorm + quick sketch ideas Clean Up (5 min) Reflection (10 min): Exit slip (What is identity in art?)
Day 2 – Sketching the Design
Day 2 – Sketching the DesignInstruction (10 min): Demo sketching pot form + layout Hands-On (30 min): Begin sketch Clean Up (5 min) Reflection (5 min): Share progress with partner
Day 3 – Refine Sketch
Day 3 – Refine SketchInstruction (5–10 min): Review expectations + examples Hands-On (30–35 min): Finalize sketch + planning Clean Up (5 min) Reflection (5–10 min): Written: What does your design communicate?
Day 4 – Practice Tile (Part 1)
Day 4 – Practice Tile (Part 1)Instruction (10 min): Demo slab + texture/incising Hands-On (30 min): Create tile + practice techniques Clean Up (5 min) Reflection (5 min): What technique was easiest/hardest?
Day 5 – Practice Tile (Part 2)
Day 5 – Practice Tile (Part 2)Instruction (10 min): Demo underglaze + sgraffito Hands-On (30 min): Apply underglaze to tile Clean Up (5 min) (Turn Tile in for Bisque Firing) Reflection (5 min): Which techniques will you use on your pot?
Day 6 – Coil Intro
Day 6 – Coil IntroInstruction (10–15 min): Demo coils, scoring, slipping Hands-On (25–30 min): Base + first coils Clean Up (5 min) Reflection (5 min): What did you learn about joining clay?
Day 7 – Coil Building
Day 7 – Coil BuildingInstruction (5 min): Quick demo/reminders Hands-On (35 min): Continue building Clean Up (5 min) Reflection (5 min): What challenges are you facing?
Day 8 – Coil Building
Day 8 – Coil BuildingInstruction (5 min) Hands-On (35 min): Build + shape form Clean Up (5 min) Reflection (5 min)
Day 9 – Coil Building
Day 9 – Coil BuildingInstruction (5 min) Hands-On (35 min): Reach full height Clean Up (5 min) Reflection (5 min)
Day 10 – Refinement
Day 10 – RefinementInstruction (10 min): Demo smoothing + rim finishing Hands-On (30 min): Refine surface + structure Clean Up (5 min) Reflection (5 min): Is your pot structurally sound?
Day 11 – Surface Planning
Day 11 – Surface PlanningInstruction (10 min): Demo transferring design Hands-On (30 min): Sketch on pot, select and organize underglaze colors Clean Up (5 min) Reflection (5 min): Where is your focal point?
Day 12 – Underglaze (Part 1)
Day 12 – Underglaze (Part 1)Instruction (10 min): Demo underglaze techniques Hands-On (30 min): Base colors Clean Up (5 min) Reflection (5 min)
Day 13 – Underglaze (Part 2)
Day 13 – Underglaze (Part 2)Instruction (5 min) Hands-On (35 min): Add details + line work Clean Up (5 min) Reflection (5 min)
Day 14 – Underglaze (Part 3)
Day 14 – Underglaze (Part 3)Instruction (5 min) Hands-On (35 min): Final details, Turn in for Bisque Firing Clean Up (5 min) Reflection (5 min): What is working best in your design?
Day 15 – Glazing Intro
Day 15 – Glazing IntroInstruction (10–15 min): Glazing demo Hands-On (25–30 min): Begin glazing Clean Up (5 min) Reflection (5 min)
Day 16 – Glazing Continued
Day 16 – Glazing ContinuedInstruction (5 min) Hands-On (35 min): Finish glazing, Turn in for Glaze Firing Clean Up (5 min) Reflection (5 min)
Day 17 – Decal Transfer
Day 17 – Decal TransferInstruction (10 min): Demo decal application Hands-On (30 min): Apply decals, Turn in for Low Firing (Cone 05) Clean Up (5 min) Reflection (5 min)
Day 18 – Gold Luster
Day 18 – Gold LusterInstruction (10 min): Demo + safety Hands-On (30 min): Apply luster, Turn in for Ultra Low Firing (Cone 018) Clean Up (5 min) Reflection (5 min)
Day 19 – Artist Statement Draft
Day 19 – Artist Statement DraftInstruction (10 min): Review prompt + expectations Hands-On (30 min): Write draft Clean Up (5 min) Reflection (5 min)
Day 20 – Revise Artist Statement
Day 20 – Revise Artist StatementInstruction (5–10 min): Peer review guidelines Hands-On (30–35 min): Revise writing Clean Up (5 min) Reflection (5 min)
Day 21 – Final Touches
Day 21 – Final TouchesInstruction (5 min) Hands-On (35 min): Finish work + prep display Clean Up (5 min) Reflection (5 min)
Day 22 – Critique Day
Day 22 – Critique DayInstruction (10 min): Critique norms Hands-On (30 min): Group critique Clean Up (5 min) Reflection (5 min)
Day 23 – Final Reflection & Display
Day 23 – Final Reflection & DisplayInstruction (5 min) Hands-On (25 min): Final reflection + display setup Clean Up (5 min) Reflection (15 min): Written reflection
Step-by-Step Instructions
Step 1
1. Practice Tile (Skill Building)Goal: Learn and practice surface techniques before working on your final pot.Wedge clay to remove air bubbles.Roll out a slab (about ¼” thick) using slab sticks.Cut a square or rectangular tile (approx. 4”–6”).Smooth edges and surface with a rib or finger.Practice techniques on tile: Incising (carving lines) Adding texture Sgraffito (scratch through underglaze later)Let the tile reach leather-hard stage. Apply underglaze to test color and layering. Label the back with your name and class. Allow to dry fully for bisque firing.
Step 2
2. Coiling the Pot Goal: Build a strong, vertical vessel using coil construction. Start with a solid base (slab or thick pancake of clay). Score and slip the base edges. Roll even coils (and thick, thick can be patted out). Attach the first coil to the base: Score both surfaces Apply slip Press firmly Continue stacking coils: One layer at a time Blend coils on the inside and outside: This makes a stronger pot Keep walls even in thickness to prevent cracking. Shape the form as you build (straight, curved, narrowed, etc.). Use ribs and fingers to smooth and refine. Pause periodically to let clay firm up (prevents collapse). Finish rim: Even and smooth Compress to prevent cracking Let the pot reach leather-hard stage before decorating.
Step 3
Underglaze Designing Goal: Apply meaningful imagery and design that reflects identity. Plan your design (portrait, symbols, text). Lightly sketch on the pot with pencil (optional). Apply underglaze in thin, even layers: Use multiple coats for solid color Use fine brushes for details and line work. For sgraffito: Apply underglaze Scratch through to reveal clay underneath Keep edges clean and intentional. Allow underglaze to dry before bisque firing (if applied at leather-hard) or after bisque if painting later.
Step 4
Glazing Goal: Apply a protective and finished surface. Ensure piece is bisque fired. Wipe the surface with a damp sponge to remove dust. Do NOT glaze the bottom (foot area). Apply glaze: Dip, brush, or pour depending on method Use 2–3 even coats if brushing Avoid drips and overly thick areas. Clean the bottom with a sponge before firing. Place carefully on the kiln shelf for glaze firing.
Step 5
Decal Transfer (After Glaze Firing) Goal: Add detailed imagery or portraits to the glazed surface. Cut out your decal image closely. Place decal in water (30–60 seconds) until it slides. Position decal onto the glazed surface. Gently slide paper backing out from underneath. Smooth the decal: Use fingers or rubber rib Remove air bubbles and wrinkles Let dry completely (24 hours recommended). Fire again according to decal instructions. (Fire Cone 05)
Step 6
Gold Luster Application (Final Step) Goal: Add final accents and highlights. Ensure piece has been glaze-fired (and decal-fired if applicable). Work in a well-ventilated area. Apply gold luster with a small brush: Use sparingly for accents (lines, edges, highlights) Avoid thick application (can burn or bubble). Let dry fully. Fire in a low-temperature luster firing. (We fire 018)

