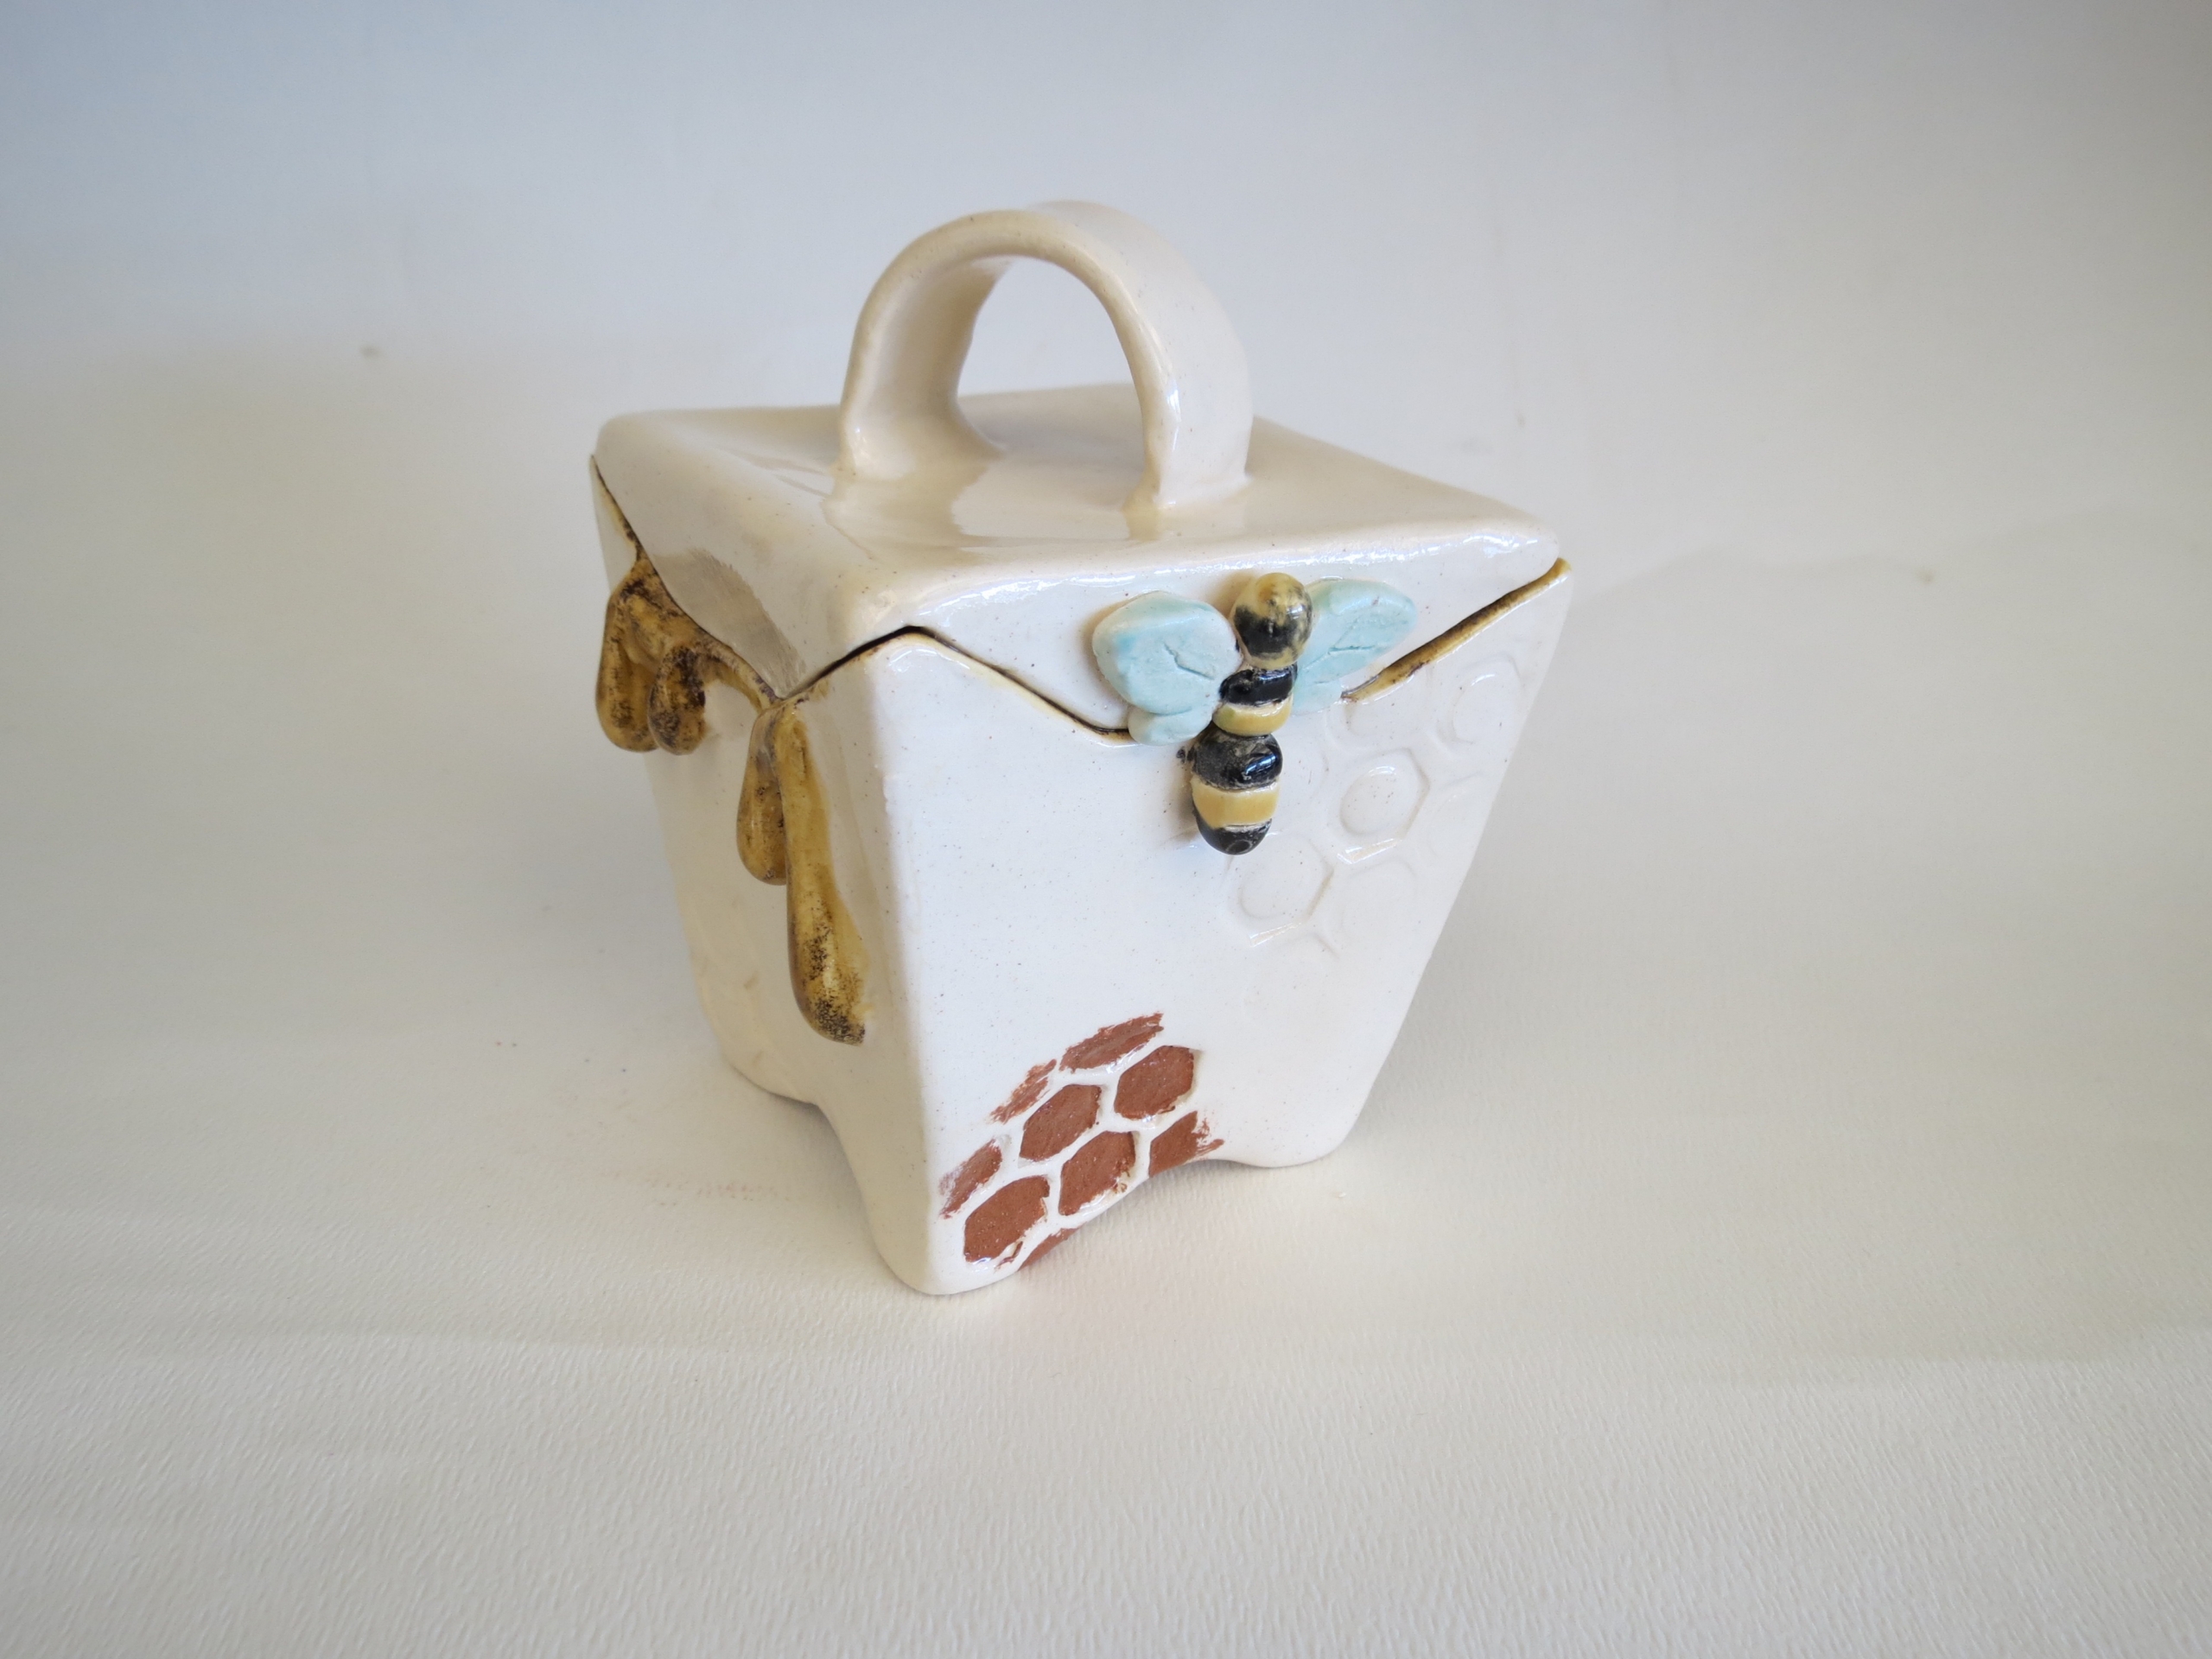
Slab Box with Roofing Paper Template
Meet The Teacher: Jennifer Fowler
I value process over product, which means I enjoy the discovery of making. I have been teaching for over 20 years now, which has been a process in itself. I am also an artist/ maker who takes inspiration from nature and the cycle of life.
Project Description
Using roofing paper, or in the case of the video a cereal box, students can create a fully enclosed box form with soft slabs. Students struggle with finding the right stage of clay to build with slabs, either too soft and floppy or too hard to join. The roofing paper solves all the issues students have building vertically with slabs.
Materials
- slab rolling tools
- scoring tool
- knife
- slip
- angle cutter
- board
- roofing paper
- clay
- slip
- glaze
- rib
- cork or pony roller
- sponge
Grade Level
High School
Difficulty
Intermediate
Student Hands-On Time
5 hours
Teacher Prep Time
1.5 hours
Project Cost / Cost Per Student
10
National Core Arts Standards - Visual Arts
- Creating - Generate and conceptualize artistic ideas.
- Creating - Organize and develop artistic work.
- Creating - Conceiving and developing new artistic ideas and work.
- Presenting - Select, analyze, and interpret works for presentation.
- Presenting - Develop skills for artistic presentation and exhibition.
- Connecting - Connect personal experiences with artmaking and meaning.
21st Century Skills
- Critical Thinking & Problem-Solving
- Creativity & Innovation
- Communication
- Flexibility & Adaptability
- Productivity & Accountability
STEAM Education
- Engineering
- Arts
Differentiations and Accommodations
Differentiation
Struggling Learners
Accommodation
Struggling learners will have more direct assistance during each stage of "demo & do".
Differentiation
Advanced Learners
Accommodation
Advanced learners can push the design construction project.
Differentiation
IEP
Accommodation
Modifications will be made based on individual needs.
Differentiation
504 Accommodations
Accommodation
Modifications will be made based on individual needs.
Learning Objectives: Knowledge
How to:build vertically with soft slabsidentify and make the parts of a lidded formjoin multiple slabs to create a hollow formwork with the stages of clay
Learning Objectives: Skills
How to:build vertically with soft slabsslip, score, and seal to properly join clay slabsjoin multiple slabs to create a hollow formwork with different stages of claysmoothing seams with a rib
Learning Objectives: Attitudes/Values
craftsmanshipcreativityperseverance
Formative Assessment
Since the process is broken into "Demo & Do", the process is evaluated with each step. Students are assisted as needed.
Summative Assessment
Rubric includes: Construction and Craftsmanship Lid and attachments Slab Thickness/ Evenness Button, Lug, Feet Overall Design Creativity and Execution
Reflection and Discussion
Reflections based on craftsmanship, construction and how techniques learned can be applied to next project.
Lesson Activities
Intro/ Examples/ Requirements
Teacher provides examples of boxes, lugs, and feet. Teacher discusses requirements of final project: lid with lug, box, feet, button/ lid and base line up indicator, overall design.
Sketches/ Planning
Students create 4-5 sketches illustrating all parts of the requirements.
Demo & Do Part 1: Cut Slab with Template
Teacher demonstrates, then students do: 1. Roll out a slab 2. compress both sides with rib 3. place templates on top of slab 4. cut out shapes, leaving templates
Demo & Do Part 2: Build Sides
Teacher demonstrates, then students do: 1. Flip template and slab shapes over 2. using angle cutter (or knife), cut the left and right sides of each slab at a 45 degree angle and keep the cut off pieces of clay (you may want to place a damp paper towel over them to keep them wet). 3. score each side you just cut, then add slip 4. starting with two slabs, put the two angles together squeezing them at the outer corner 5. add the cut off from the angle cut to the inside corner and smooth 6. repeat with all 4 sides
Demo & Do Part 3: Top and Bottom
Teacher demonstrates, then students do: Roll out another slab, if needed at this step 1. Turn 'box' upside down on new slab 2. trace around box onto slab that will be your lid 3. remove box and score within the trace marks 4. score the top of box, add slip, and replace box 5. cut excess clay from the lid and flip back over 6. use any extra angle cut offs on the inside of the lid (you can always roll coils) 7. use a pony roller or cork to roll lid onto top of box edgesRepeat all steps for the bottom with 1 exception. The bottom needs to be more flexible to fit into the "cut outs". To make the clay slab more flexible, hold it in the air and "flick" it slightly, turn and repeat. You will not be able to add the angle cut offs to the inside bottom at this time. Also at this time I demonstrate adding the feet and how to level out the box. Also, with the bottom, students can choose to cut the excess clay tightly or leave a little extra for a "glaze catcher" this will simply require rolling the edge of the excess upwards with the cork.With block scheduling I typically get to this stage and wrap the box up for the next class block. Keep the template on- it helps retain moisture.
Demo & Do Part 4: Remove Template, Smoothing Sides
Teacher demonstrates, then students do: 1. The clay should be stiff leather-hard at this stage. You can now remove the templates. 2. smooth the corner seams 3. use a metal or plastic rib to scrape sidewalls and smooth out all seams 4. if you want a rolled bottom edge, roll it now with a cork or pony roller, and smooth
Demo & Do Part 5: Cutting Lid
Teacher demonstrates, then students do: Two options- trace one side of the roofing paper template onto regular paper OR use one piece of the roofing paper template. I prefer to trace the template onto regular paper as I have a class set of templates I like to reuse from year to year. 1. Using one side of template (or traced template on regular paper) draw your lid design 2. Cut lid design, creating a template for lid. Keep in mind a straight line will not have a "notch" to keep the lid from falling off 3. Place lid template on one side of box and trace 4. Repeat for all 4 sides. 5. Trace lid lines with a knife, scoring the clay. 6. Repeat step 5, gradually cutting the lid while avoiding pressing too hard and warping the box sides. 7. Once lid is cut, use a combination of knife and sponge to smooth the top of the box and bottom of lid where you just cut. 8. Now you can add a coil to the inside of the bottom of the box.
Independent Work: Decorating Based on Concept
Now the construction phase of the box is complete, students are able to work independently with the surface design phase of the project. This can be open or you could set requirements based on surface decoration techniques you might be teaching. I tell students they must have 1. a lug, 2. feet, 3.button or lid/ base line up indicator, and 4.an overall design.
Finishing
Dry Fire Glaze (discussion and demo of waxing lid to prevent glazing together) Fire Sand bottom Display

