Illuminated Letters
Meet The Teacher: Alexis Harper
Alexis Harper is a painter and ceramic artist who loves working with color and animal imagery. She has taught art for 15 years, including the past two years teaching ceramics at Rogers High School. Her classroom focuses on clay as a creative outlet that supports mental wellness and highlights the role art plays in strengthening communities.
Project Description
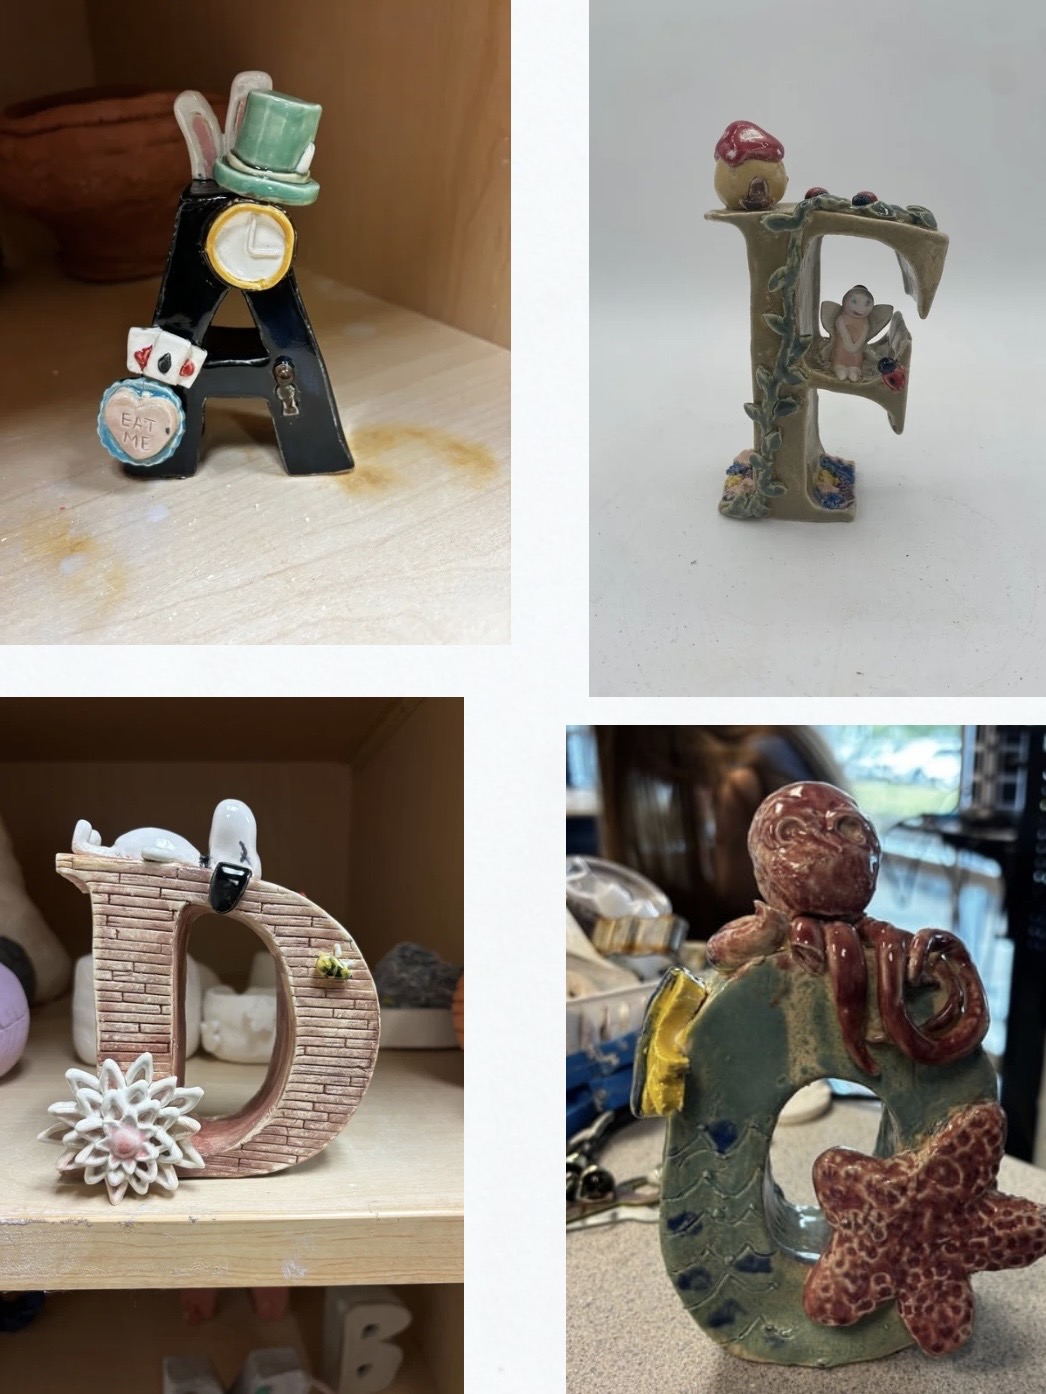
Students explore the history of medieval illuminated manuscripts and transform a single letter into a freestanding ceramic sculpture. Using slab construction and surface decoration, they design a themed letter that incorporates texture, symbolism, and sculptural elements.
Materials
- 2lbs of Clay per student
- Glaze, underglazes, or even acrylic paint tp complete the piece
- Slip to attach pieces
- Basic clay tools (needle tool, rib, modeling tools. etc.)
- Texture tools, stamps or rollers
- Paper and Pencil for sketching
Grade Level
High School
Difficulty
Intermediate
Student Hands-On Time
5-7, 45 minute classes for construction, 1-2 classes for glazing/ painting
Teacher Prep Time
30-60 minutes
Project Cost / Cost Per Student
5
National Core Arts Standards - Visual Arts
- Creating - Generate and conceptualize artistic ideas.
- Creating - Organize and develop artistic work.
- Presenting - Develop skills for artistic presentation and exhibition.
- Responding - Interpret intent and meaning in artwork.
- Connecting - Relate artistic ideas to historical, cultural, and social contexts.
- Connecting - Connect personal experiences with artmaking and meaning.
21st Century Skills
- Critical Thinking & Problem-Solving
- Creativity & Innovation
- Communication
- Initiative & Self-Direction
- Productivity & Accountability
STEAM Education
- Engineering
- Arts
- Mathematics
Differentiations and Accommodations
Differentiation
IEP
Accommodation
Provide templates, step-by-step visual instructions, and additional time for construction. Advanced Learners
Differentiation
Advanced Learners
Accommodation
Encourage complex surface decoration, narrative scenes, or functional additions like hidden compartments.
Differentiation
Struggling Learners
Accommodation
Allow simplified themes and fewer added elements while focusing on successful slab construction.
Learning Objectives: Knowledge
Students will understand the historical purpose of illuminated letters in medieval manuscripts and how artists used decoration, symbolism, and design to emphasize important text.
Learning Objectives: Skills
Students will develop slab-building techniques, scoring and slipping for attachment, surface decoration methods, and three-dimensional design skills.
Learning Objectives: Attitudes/Values
Students will value craftsmanship, creativity, and persistence while exploring personal themes and historical artistic traditions.
Formative Assessment
Teacher observation during sketching, construction, and decoration. Students receive feedback on structure, craftsmanship, and theme development throughout the process.
Summative Assessment
Final evaluation based on: Clear theme connected to the chosen letterCraftsmanship and construction Meeting size and detail requirements Effective use of decorative elements Written artist reflection
Reflection and Discussion
- How did historical illuminated letters influence your design?
- What techniques helped make your letter stable and structurally sound?
- How does your theme communicate meaning through texture, symbols, or objects?
Lesson Activities
Introduction and Planning
Students learn about illuminated letters in medieval manuscripts and view examples. They choose a letter, brainstorm a theme, and create design sketches in their sketchbooks.
Slab Construction
Students roll out slabs, create two identical letters, and attach a perimeter slab to form a hollow freestanding structure.
Surface Design
Students add textures, objects, patterns, and sculptural elements that reinforce the theme of their letter.
Finishing and Reflection
After bisque firing, students apply underglaze or glaze. Students photograph their work and write a short reflection explaining their theme and design choices.
Step-by-Step Instructions
Step 1
Step 1 Choose a letter and brainstorm a theme related to that letter. Sketch design ideas in a sketchbook.
Step 2
Create a paper template of the letter and roll out clay slabs about ¼ inch thick.
Step 3
Cut two identical letters from the slab using the template.
Step 4
Measure the perimeter of the letter and cut a slab strip to connect the two letters.
Step 5
Measure the perimeter of the letter and cut a slab strip to connect the two letters.
Step 6
Allow the structure to firm up before attaching the second letter.
Step 7
Attach the second letter and check that the sculpture stands independently.
Step 8
Add textures, coils, stamps, and decorative features that reinforce the theme.
Step 9
Allow the piece to dry fully before bisque firing.
Step 10
Apply underglaze, glaze, stains, or washes after bisque firing and fire again to complete the project.

