Built to Succeed: A Pinch and Coil Approach

Meet The Teacher: Melanie Rasmussen
I am a high school ceramics teacher at Ellet CLC with over 30 years of experience in Akron Public Schools. I believe students learn best by making, and my teaching centers on simple, structured processes that build confidence and lead to strong, personal work. I aim to help students see themselves as capable artists.
Project Description
Students build on their pinch pot skills to create a coil vessel using repetition, structure, and design. This scaffolded approach helps beginners develop stronger construction techniques while building confidence in working with clay.
Materials
- Mid-range clay (1–2 lbs)
- Basic clay tools (wood tools, needle tool, rib)
- Sponge/water
- Access to stamps or texture tools (shared)
- Glaze
- Plastic bags for storage
Grade Level
High School
Difficulty
Easy
Student Hands-On Time
3-4 class periods
Teacher Prep Time
30-45 minutes
Project Cost / Cost Per Student
3
National Core Arts Standards - Visual Arts
- Creating - Generate and conceptualize artistic ideas.
- Creating - Organize and develop artistic work.
- Creating - Conceiving and developing new artistic ideas and work.
- Responding - Perceive and analyze artistic work.
- Responding - Evaluate and critique based on aesthetic and technical qualities.
- Connecting - Connect personal experiences with artmaking and meaning.
21st Century Skills
- Critical Thinking & Problem-Solving
- Creativity & Innovation
- Initiative & Self-Direction
- Productivity & Accountability
STEAM Education
- Arts
Differentiations and Accommodations
Differentiation
IEP
Accommodation
Extended timeStep-by-step visual examplesOne-on-one support as needed
Differentiation
Advanced Learners
Accommodation
Advanced students can create more complex forms or additional surface detail
Differentiation
Struggling Learners
Accommodation
Pre-rolled coils available if neededFlexible design expectations based on skill level
Learning Objectives: Knowledge
Students will understand how combining techniques (pinch and coil) improves structure and form. They will recognize how repetition and surface design contribute to the overall success of a ceramic piece. Students will also understand how glaze choice impacts surface detail.
Learning Objectives: Skills
Create an even pinch pot base Roll and apply consistent coils Compress and build form, smoothing from the inside Use repetition through coil motifs Apply glaze to enhance surface design
Learning Objectives: Attitudes/Values
Students will develop confidence in working with clay through a scaffolded process. They will learn persistence, problem-solving, and the value of craftsmanship. Students will also begin to see themselves as capable artists.
Formative Assessment
Observation during building processChecking for proper coil construction and compressionFeedback during motif development and design choices
Summative Assessment
Construction and stabilityCraftsmanshipUse of repetition and designCompletion of project requirements (height, motifs)
Reflection and Discussion
How did starting with a pinch pot help your success?What challenges did you face with coils?How did repetition affect your design?How did your glaze choice impact the final result?
Lesson Activities
Activity 1: Introduction & Demo
Students review pinch pot technique and are introduced to coil building. Teacher demonstrates forming a pinch base, rolling coils, and building upward using smoothing and compression from the inside.
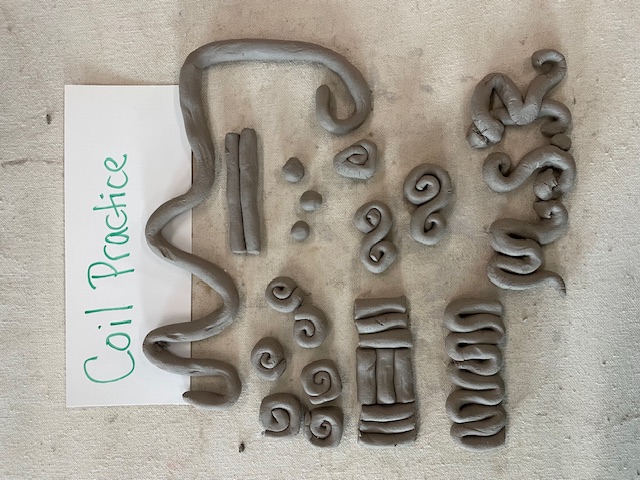
Activity 2: Coil Practice
Students practice creating different coil motifs (spirals, geometric shapes, letter forms) before beginning their final piece.
Activity 3: Building the Vessel
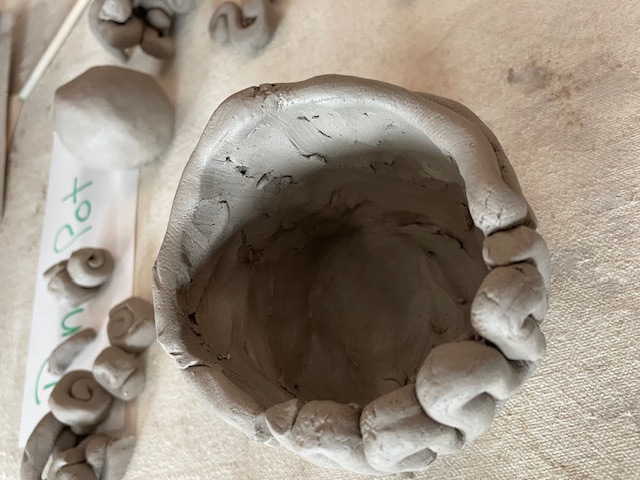
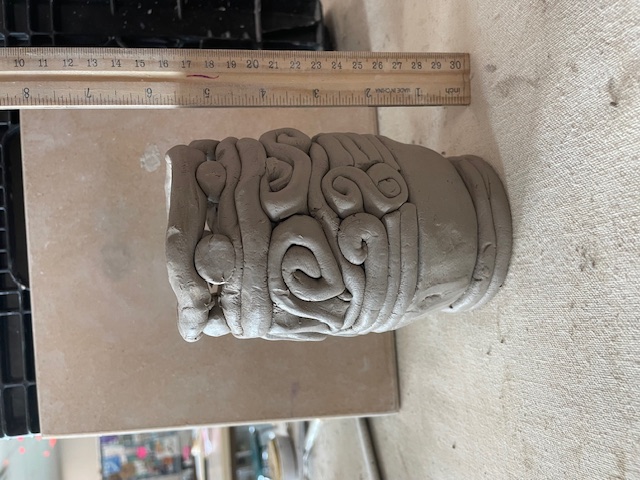
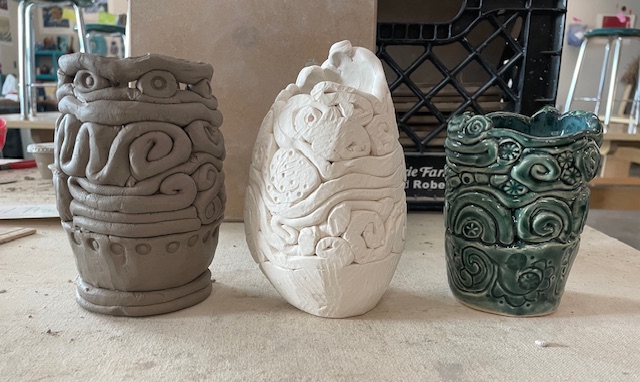
Students construct a vessel at least 6 inches tall using a pinch base and coils. Emphasis is placed on structure, even thickness, and controlled form.
Activity 4: Design & Surface
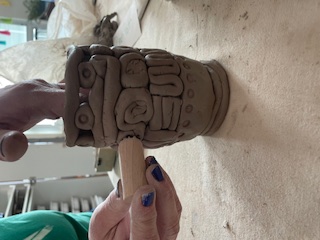
Students incorporate 3–5 coil motifs with repetition. They may also use carving, stamping, or small added forms to enhance surface design.
Activity 5: Glazing & Reflection
Students select glaze carefully, considering how it will affect surface detail. Class discussion and reflection follow.
Step-by-Step Instructions

Step 1
Create an even pinch pot base with consistent wall thickness.Set this aside to stiffen up and begin coiling lesson. Teacher led instruction practicing coils
Step 2
Teacher led instruction practicing coils, Roll coils of even thickness and practice different coil styles, Spiral (tight or loose) Zig-zag / wave, Heart shape, Square or geometric shape, Letter or symbol, Loop or double loop Stacked lines (parallel coils) These practice coils will become your coil motifs You will use 3–5 of these shapes in your final vessel Repetition of one or more motifs will help create a strong design
Step 3
Build Up with Coils (Structure + Control) 1. Check Your Pinch Pot Base Your pinch pot should be: Even thickness (about pinky finger thickness) Firm but not dry (leather soft, not floppy) If it feels too soft → let it sit for a few minutes If too dry → lightly dampen with a sponge 2. Start Adding Coils Place your coil on the rim of the pinch pot Gently press it into place If the clay is soft, You do not need to score and slip You will attach by compressing and smoothing on the inside with fingers or wooden tools

Step 4
Attach by Compressing (Most Important Step) Use your fingers on the inside of the pot Press and smooth the coil downward into the wall Blend the coil into the form as you go Think: push + smooth + connect You can lightly smooth the outside, but most of the work happens inside
Step 5
Build Slowly to Keep Shape Add one row or section one at a time Compress from the inside smoothing as you go with a wooden tool Keep adding and check your form as you go. Add a foot if you want and check for height with a ruler
Step 6
Refine rim and overall form. Clean up clay crumbs and cracks, overall craftsmanship Enhance surface with carving, stamping, or added clay forms, If desired
Step 7
Let dry, Fire to con 04 (Bisque Fire) Glaze with attention to thickness to preserve surface detail, I like to use Amaco Celadon Glazes Fire midrange Cone 6

