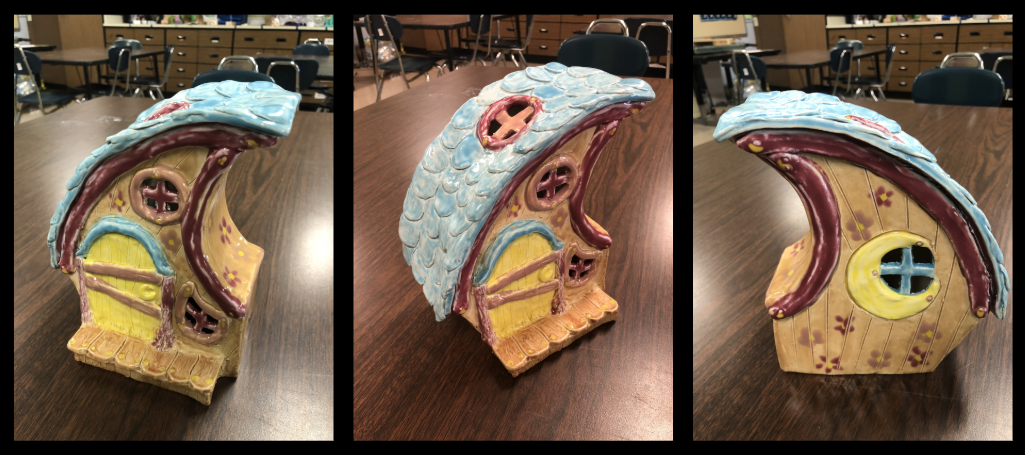
Whimsical Slab Houses
Meet The Teacher: Laura Cope
Laura Cope is a high school art teacher in Western KY and has been teaching for 13 years. She graduated from Campbellsville University and got her masters at Murray State.
Project Description
This project is a fun way to combine hand building techniques such as coil, pinch, and slab, focusing on slab for the main structure. Students will use artists such as Dr. Suess, Tim Burton, Patrick Dougherty, etc. They will use their inspiration to create a house that incorporates whimsical elements that you don't see on an everyday basis.
Materials
- Clay (recommend around 2 lbs per student)
- Shaping tools
- Glaze or acrylic paint (your choice)
- Kiln
Grade Level
High School
Difficulty
Intermediate
Student Hands-On Time
3-4 90-minute classes
Teacher Prep Time
30
Project Cost / Cost Per Student
10
National Core Arts Standards - Visual Arts
- Creating - Generate and conceptualize artistic ideas.
- Creating - Organize and develop artistic work.
- Creating - Conceiving and developing new artistic ideas and work.
- Responding - Perceive and analyze artistic work.
- Responding - Evaluate and critique based on aesthetic and technical qualities.
21st Century Skills
- Creativity & Innovation
- Collaboration
- Flexibility & Adaptability
- Initiative & Self-Direction
- Productivity & Accountability
STEAM Education
- Engineering
- Arts
- Mathematics
Differentiations and Accommodations
Differentiation
IEP
Accommodation
Depending on the student's needs, you could use polymer clay, paper clay, play dough, model magic, or air dry clay. When determining the students needs, consider fine motor capabilities, level of cognition for following all the steps, extended time needs, etc.
Learning Objectives: Knowledge
Students will be able to define: coil, pinch pot, slab, leather hard, green ware, bisque ware, and scoring. Students will demonstrate creative thinking by incorporating original ideas into their structure.
Learning Objectives: Skills
Students will be able to use a commination of hand building skills to build a balanced structure. Students will demonstrate craftsmanship by ensuring the stability of the structure, making sure pieces are joined well and glaze/paint covers well.
Learning Objectives: Attitudes/Values
Students will utilize copyright policies appropriately, not copying another artists work. Students will demonstrate collaboration by giving and receiving feedback from classmates and the teacher with a respectful attitude.
Reflection and Discussion
What is "whimsy?" How would you describe the mood of your design? Give examples. Reflect on your work. What is the best aspect of it in your opinion? Why? Reflect on your work. What could you have done to improve your work? Share with your table about your design choices. Two likes and a wish with partners (sketches, midway, and final)
Lesson Activities
Step-by-Step Instructions
Step 1
Have students draw thumbnails of their designs. These need to be in technical sketch format, having views from different angles/sides.
Step 2
Create a template out of cardboard for the slab pieces. Students will determine measurements and cut the cardboard into the size and shapes of what they need their slabs to be. Have them piece the model together with tape to make sure the pieces fit together properly.
Step 3
After students make sure their pieces fit together properly, they can take the cardboard apart and use it to cut the shapes out of the clay.Have students roll the clay out to about 1/4 in thick. Cut slabs out with the student made templates.
Step 4
If the slabs need to stay straight, lay them flat, loosely covered to become leather hard over night. If a slab needs to be soft and moldable, have students go ahead and shape it, drape it, or save it to connect to other pieces the next day.(IF STUDENTS WANT TEXTURES, they need to be added before slabs are leather hard.)
Step 5
While students wait for slabs to become leather hard, students can work on embellishments to add later.
Step 6
After embellishments are made and slabs are leather hard, join the pieces together by scoring the edges and adding a slurry/slip for a "glue." Continue adding anything to the design until complete. Make sure you keep everything moist enough to work with if you have to clean up in the middle of the project.
Step 7
When finished, unwrap and let air dry until in the bone dry stage.
Step 8
Bisque fire.
Step 9
Glaze or paint your pieces.Fire glazed pieces.You are finished!

