Personalized Name Tags
Meet The Teacher: Caralene Hanania
Cara is a 5th year ceramics teacher a Vista Murrieta High School teaching grades 9-12 in Ceramics 1, Ceramics 2, Ceramics 3, and Ceramics 4. She is a Clay Club advisor, and provides free workshops after school for all students. She creates a dynamic studio environment where students can express themselves and grow on their ceramics skills.
Project Description
Students will create unique and personalized name tag using a 7” x 9” slab, transfer their name in a chosen font, divide it in half, and showcase contrast using high relief on one side and sunken relief on the other.
Materials
- Paper
- Pencil
- Printer (optional)
- Canva
- 2 pounds of clay
- Rib tool
- Sponge
- Cup of water
- Fettling knife
- Ruler
- Needle tool
- Small paintbrush
- Large loop tool
- Small loop tool
- Spear and paddle tools for carving
Grade Level
High School
Difficulty
Easy
Student Hands-On Time
2 weeks
Teacher Prep Time
30 minutes
Project Cost / Cost Per Student
5
National Core Arts Standards - Visual Arts
- Creating - Organize and develop artistic work.
- Presenting - Develop skills for artistic presentation and exhibition.
- Responding - Perceive and analyze artistic work.
- Connecting - Relate artistic ideas to historical, cultural, and social contexts.
21st Century Skills
- Critical Thinking & Problem-Solving
- Creativity & Innovation
- Information Literacy
- Media Literacy
- Initiative & Self-Direction
- Productivity & Accountability
STEAM Education
- Arts
Differentiations and Accommodations
Differentiation
IEP
Accommodation
Provide opportunities for simplified techniques or smaller surface areas. Simplify the name to initals or to a nickname/preferred name. Give extended due dates. Provide printed photo and text step-by-step instructions. Display physical realia for students to reference.
Differentiation
504 Accommodations
Accommodation
Provide opportunities for simplified techniques or smaller surface areas. Simplify the name to initals or to a nickname/preferred name. Give extended due dates. Provide breaks when needed. Provide printed photo and text step-by-step instructions. Display physical realia for students to reference.
Differentiation
Advanced Learners
Accommodation
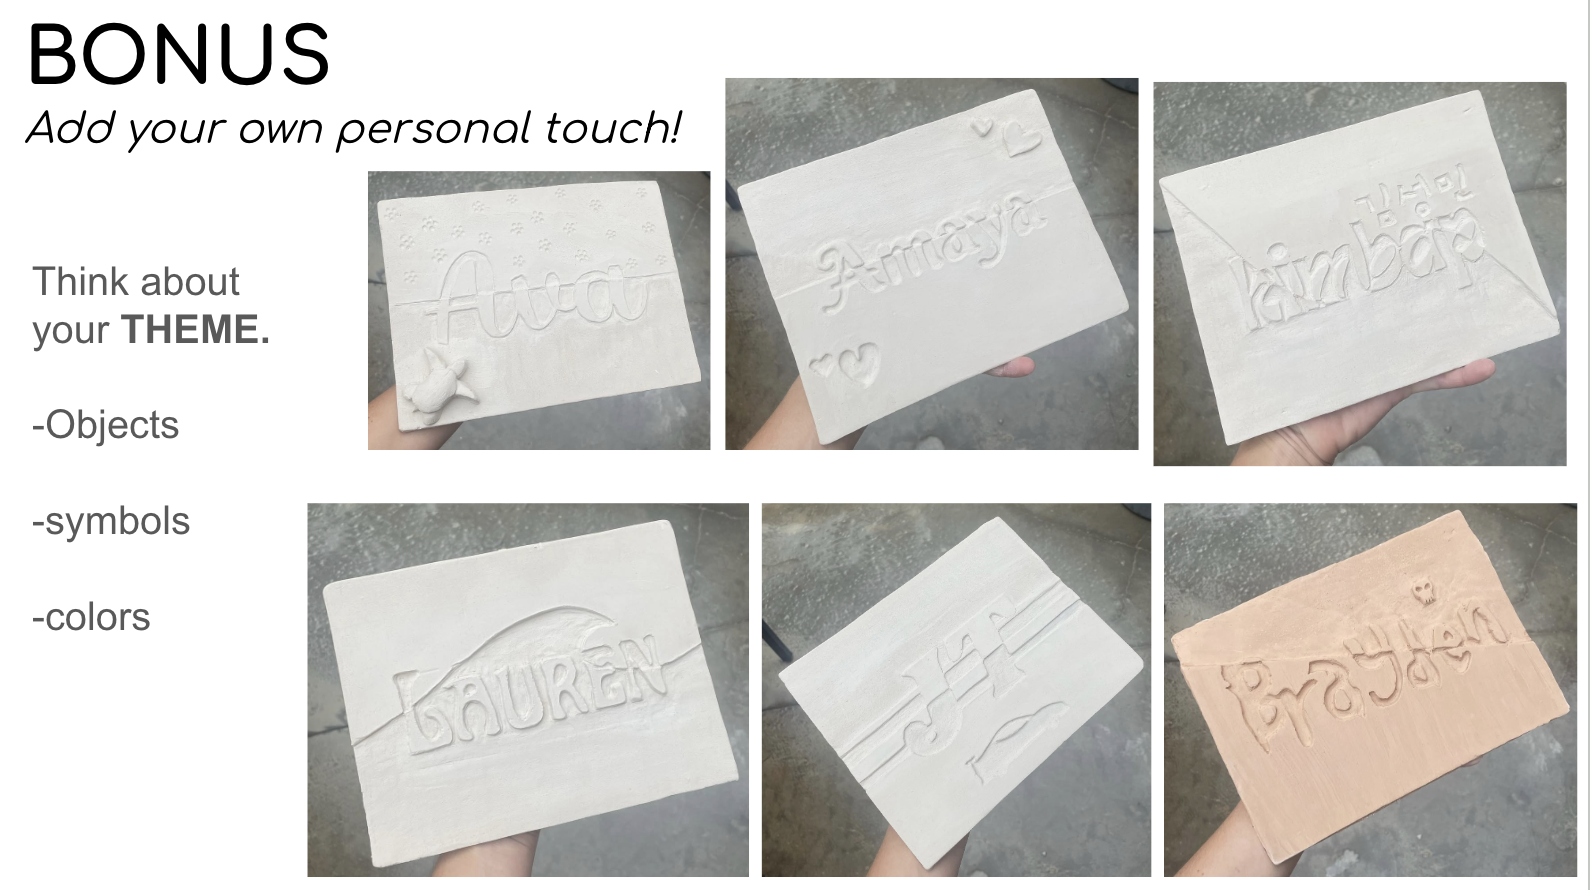
Provide opportunities for more complex techniques or additional challenges. For example, what sculptural attachments (based on your theme) can you add to personalize this name tag further? What textures/stamps can you add to the background around your name?
Learning Objectives: Knowledge
Students will be able to understand the difference between low relief, high relief, and sunken relief carvings in artworks. Students will be able to sketch an artwork from contemporary art, analyze the artwork, interpret the artwork, and evaluate the artwork.
Learning Objectives: Skills
Students will be able to create a rectangular slab that is 7” x 9”. Students will be able to create their name in a desired font on a sheet of paper & transfer onto their slab. Students will be able to divide their name on their slab in half. Students will be able to show contrast in their name through clean high relief carving on one half and deep or sunk relief on the other half.
Learning Objectives: Attitudes/Values
-Patience: Students will need to understand that relief carving requires time, focus, and careful craftsmanship. -Attention to Detail: Students will need to emphasize precision in transferring their name and executing clean, intentional carving. -Creativity & Personal Expression: This lesson encourages students to choose a font that reflects their style and thoughtfully design their composition. Students will be challenged with the bonus of adding symbols that best represent them and their overall theme of their name tag. -Growth Mindset: Students will need to embrace the challenges of carving and learn from mistakes to improve carving skills.
Formative Assessment
Observe student engagement in practice carving tiles and sketchbook notes, and provide ongoing feedback.
Summative Assessment
Evaluate the finished pieces (using a 4-3-2-1 rubric) based on criteria such as creativity, technique, effort, and adherence to the project guidelines. Evaluate their self-reflection assessment.
Reflection and Discussion
1. Why did you choose your specific font? How does it reflect your personality or artistic style?2. What challenges did you face while carving, and how did you overcome them?3. What techniques did you use to ensure clean carving and smooth edges?4. How did your glaze choices enhance the contrast in your design?5. What skills did you improve on during this project?6. If you were to redo this project, what would you do differently?7. Write a short reflection (3-5 sentences) about what you learned from this project and how it might influence your future ceramic work.
Lesson Activities
Sketch, Analyze, Interpret, Evaluate an Artwork
In this activity, students will reflect on the fine bas relief artwork of Victoria Ellis. This activity develops a deeper understanding of an artwork through visual and critical thinking skills.1. Students create a quick drawing of the artwork, focusing on key details, composition, and design elements. This helps them observe the piece more closely. 2. Students examine the formal qualities, such as line, shape, texture, contrast, and use of space, to understand how the artist created the work. 3. Students explore the possible meaning behind the artwork, considering the subject matter, symbolism, and emotional impact. 4. Students form an opinion about the artwork’s effectiveness, craftsmanship, and overall impact, supporting their thoughts with observations.
Types of Relief Carvings
In this lesson, there's a discussion on low relief, high relief, and sunken relief, using visual references from art history to highlight key differences. Students will then create a small test slab where they practice each type of relief carving. This hands-on exercise helps them understand depth, contrast, and craftsmanship before applying these techniques to their name slab project.
Creating Name Design on Canva
Students will use Canva to design their name in a chosen font, ensuring it reflects their personal style. They will experiment with different typefaces, sizes, and layouts to create a visually appealing design and compostion. Once finalized, they will put a sheet of paper over their chromebook screen and trace their font onto the paper. The students will use this as a template for transferring onto their 7” x 9” slab in preparation for relief carving. The transfer method technique involves placing the paper ontop of the clay and outlining the paper with pressure so that the design trasfers to clay. This activity helps students develop an eye for typography while integrating digital design into their ceramics project.
Independent Practice on Carving Their Personalized Name Tag
Students will work independently to apply their relief carving techniques to their clay slabs. Using their transferred name design as a guide, they will carefully carve one half of their name in high relief, raising parts of the letters from the background, and the other half in low/sunken relief, carving the letters into the surface. They will focus on clean, precise carving, ensuring contrast between the two techniques split inbetween their names. Throughout the process, students will refine their craftsmanship, troubleshoot challenges, and develop confidence in their relief carving skills.
Glazing Personalized Name Tags
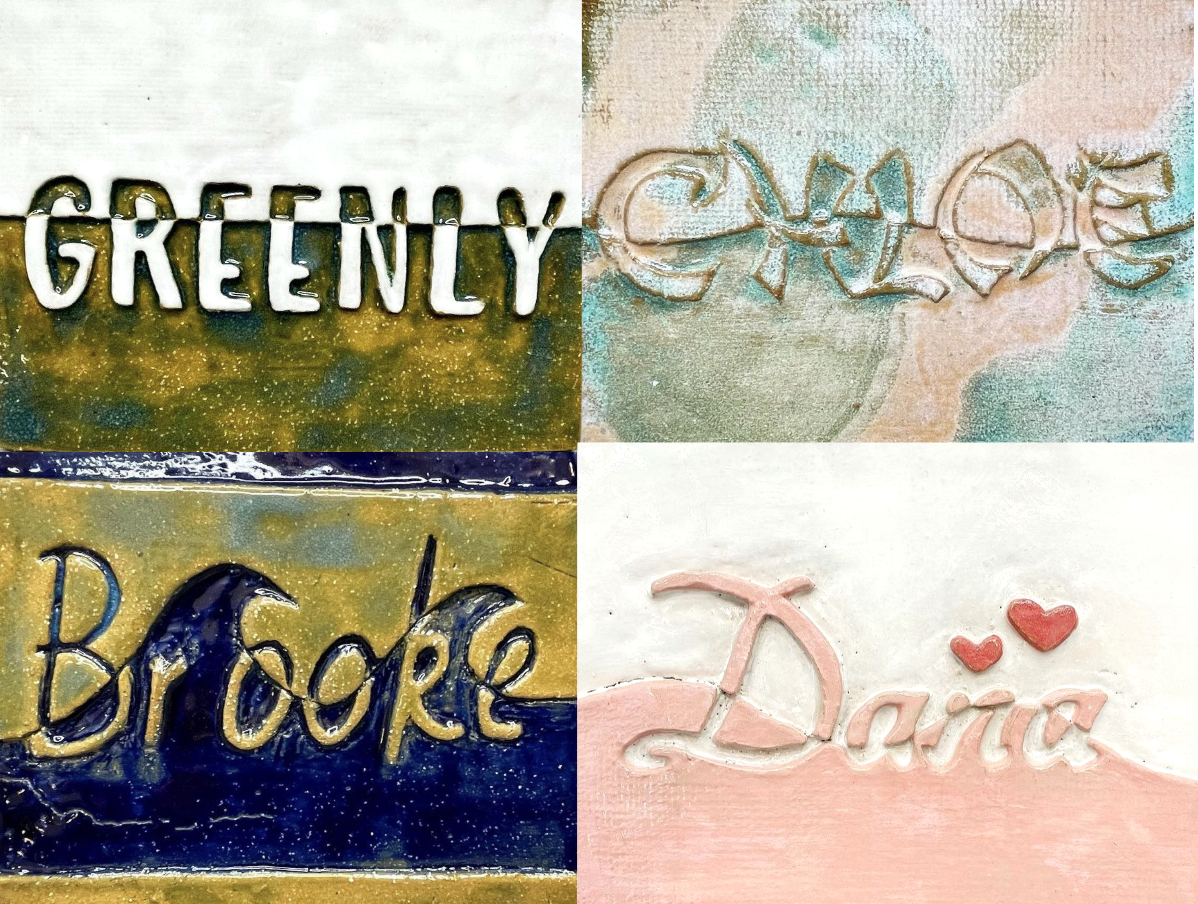
Students will apply glaze to their personalized name tag to enhance the contrast between the high relief and sunken relief areas. They will carefully select glazes that emphasize depth and dimension, such as using a darker or matte glaze in recessed areas and a lighter or glossy glaze on raised sections.
Step-by-Step Instructions

Step 1
You will need a computer/laptop to access the Canva "Name Template", a pencil, and a paper.Open up the Canva link to the Name Template provided in this lesson.Type the name you want to use for your Personalized Name Tag.Explore Different Fonts, Font Sizes, and Compositions that best tailor to your style.Once you finalized your name font, grab your sheet of paper and use artist tape to secure the paper onto your computer/laptop screen. (This is a make-shift lightbox. You could also just print out this template.) In a dark room, trace the letters on your paper.This will be used as your template for your slab.

Step 2
1)Roll Slab using wooden ¼” dowels on each side and a rolling pin. Make sure it is even thickness all the way through when rolling.2) Use a metal RIB tool to smooth clay on both sides.3) Use 7”x9” template to cut slab evenly. Use a straight-edge to keep edges straight.4) Stack your slab inbetween two board to have the slab dry to the leather-soft stage. This will prevent warping of the slab.

Step 3
Your slab should be a leather-soft stage right now. Clean both sides of the slab and the edges of the slab with a SPONGE & metal RIB, so everything is EVEN and SMOOTH. CRAFTSMANSHIP IS KEY!!!!!You might need a ruler and fettling knife to cut/make straight lines for straight edges.

Step 4
Place paper template on slab. With a NEEDLE TOOL, poke holes along the lines of your name (imprinting into the clay). The closer the holes are, the better.This transfers the font of your name onto the clay.Connect the dots to solidify the letters.

Step 5
Decide how you want to divide your name. Are you just going to do a straight horizontal line? Or are you going to come up with something unique?

Step 6
By dividing your name (horizontally, diagonally, wavy etc.) you will have one section with large areas carved out and the other section small areas carved out. You must have contrast with the positive and negative space through each half section.Plan/Mark what areas are going to be carved out and which areas will remain the same.

Step 7
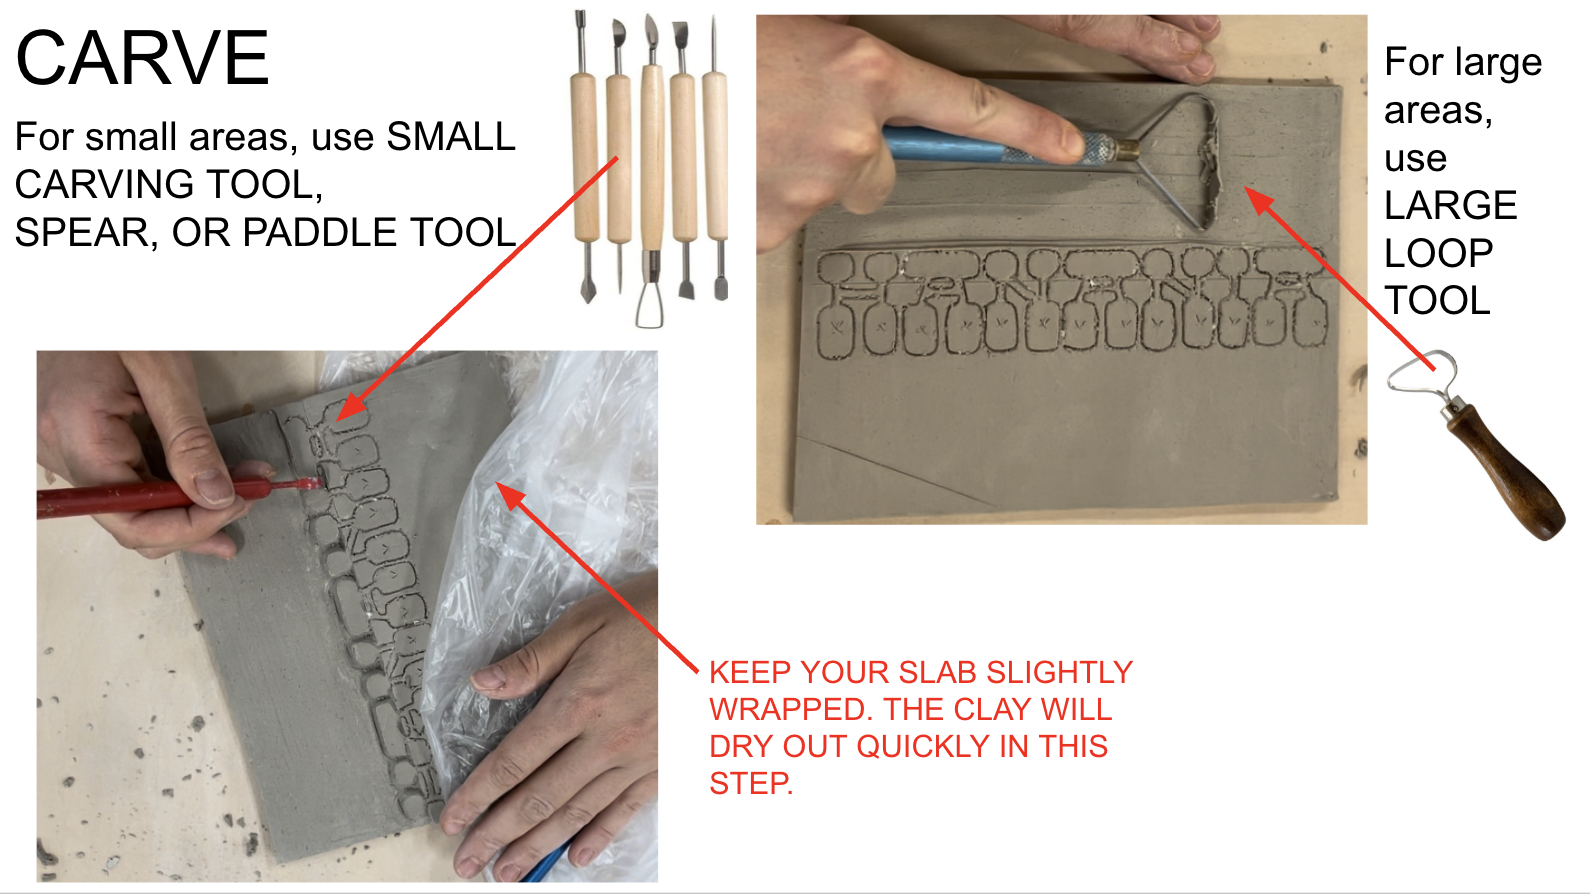
CARVE. One half of your name will have raised letters and carved out background. The other half will have sunken letters and raised background. For small areas, use SMALL CARVING TOOL, SPEAR TOOL, OR PADDLE TOOL. For large areas, use LARGE LOOP TOOL.

Step 8
Clean Up!Use a paint brush and a small amount of water to smooth any areas of clay. You could also use the back of the paint brush to smooth small rounded areas.

Step 9
Bonus Step! Add your own personal touch with sculptural attachments or stamps.Think about your THEME; -Objects -symbols -colors with underglaze

Step 10
Glaze.They will carefully select glazes that emphasize depth and dimension, such as using 2 different colored glazes OR a darker/matte glaze in recessed areas and a lighter/glossy glaze on raised sections.


