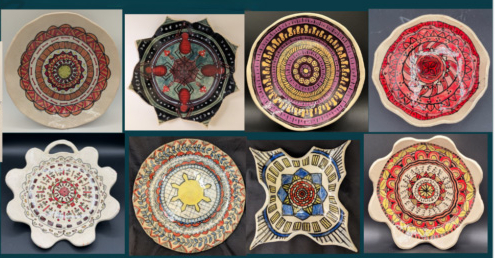
Mandala Inspired Radial Push Plate
Meet The Teacher: Heather Domeier
I have been teaching Ceramics and Sculpture and Foundations of Art and Culture at Quince Orchard High School for the last 7 years. We are located in a suburban Maryland community just south of Washington DC.
Project Description
Students learn about sand mandalas and other forms of radial design. Then create their own radial designs using symbols they develop to express themselves (hobbies, culture, family). Students learn about slab construction through building a push-plate with interesting feet.
Materials
- Clay
- Slip trailing bottles
- Underglazes (Primary colors, black, and white)
- Clear Glaze
Grade Level
High School
Difficulty
Easy
Student Hands-On Time
4 weeks
Teacher Prep Time
Prep as you go ~1 hr per day
Project Cost / Cost Per Student
5
National Core Arts Standards - Visual Arts
- Creating - Generate and conceptualize artistic ideas.
- Creating - Organize and develop artistic work.
- Creating - Conceiving and developing new artistic ideas and work.
- Connecting - Relate artistic ideas to historical, cultural, and social contexts.
- Connecting - Connect personal experiences with artmaking and meaning.
21st Century Skills
- Critical Thinking & Problem-Solving
- Creativity & Innovation
- Communication
- Flexibility & Adaptability
- Initiative & Self-Direction
- Social & Cross-Cultural Skills
- Productivity & Accountability
STEAM Education
- Technology
- Arts
Differentiations and Accommodations
Differentiation
IEP
Accommodation
Posting videos for each step of the process. Students can rewind, pause, and replay.
Differentiation
IEP
Accommodation
Photo guides with step-by-step instructions in English and Spanish are on each table.
Differentiation
IEP
Accommodation
Providing students with cookie cutters to cut shapes for feet
Differentiation
IEP
Accommodation
Lunch and afterschool support.
Differentiation
Advanced Learners
Accommodation
After finishing their basic slab plate, they might choose to create a series of small plates, each with a different radial design, or even create a 3D piece (like a bowl or tray) using similar techniques.ORAdding handles to their original plate
Differentiation
Struggling Learners
Accommodation
They could work on a smaller, simplified version of the project like a mini plate. They could also create a radial design using our stamp tools instead of the slip trailing transfer.
Learning Objectives: Knowledge
Students will define a push plate and describe its traditional and contemporary uses in both functional and decorative ceramics.Students will identify the characteristics of slab-built ceramics, including appropriate thickness, drying stages (leather hard, bone dry), and structural considerations.Students will explain the importance of scoring, slipping, and compression when joining clay pieces to ensure strong, lasting connections.Students will recognize and describe radial balance as a design principle used to organize visual elements around a central point.Students will explore the concept of mandalas as culturally significant examples of radial design, understanding their origins, symbolism, and use across different cultures.Students will identify and analyze the use of line, shape, and color in radial designs, and explain how these elements contribute to visual harmony and unity.Students will describe how underglaze transfers work, including the process of applying them and how they differ from other surface decoration techniques.Students will understand how to create tints and shades and describe how they can be used to add depth, contrast, and emphasis in a radial design.Students will discuss the function of feet on ceramic forms, including how they enhance stability, elevate the form, and contribute to the overall aesthetic.
Learning Objectives: Skills
Students will apply slab construction techniques to create a functional push plate, demonstrating control over thickness.Students will use scoring and slipping techniques to successfully join slab feet to their push plate, ensuring a secure and stable attachment.Students will use a radial design layout to organize their composition, demonstrating symmetry and balance in their pattern creation.Students will apply underglaze transfer techniques to decorate their push plate, demonstrating care in the transfer process (managing water and pressure).Students will manipulate color by applying underglazes in a way that uses tints, shades, and complementary colors to create contrast in their radial design.Students will refine their work by smoothing edges, ensuring clean lines, and correcting imperfections in both the form and decoration.Students will demonstrate effective use of tools for both shaping the clay and transferring designs, including using clay tools, brushes and transfer paper.Students will work with clay in different stages of dryness, recognizing when the clay is at the correct stage for each step (leather hard for foot attachment).Students will maintain a clean workspace and demonstrate proper studio safety when handling tools, materials, and clay.
Learning Objectives: Attitudes/Values
Students will demonstrate patience and persistence by understanding that creating a well-crafted piece takes time and effort, including working through challenges and refining their designs.Students will value the process of experimentation by embracing mistakes as part of their learning journey and being open to trying new techniques, materials, and approaches.Students will show respect for their peers' work by offering constructive feedback, sharing ideas, and maintaining a collaborative and supportive classroom environment.Students will practice self-reflection by thoughtfully assessing their own work and identifying areas for improvement while also recognizing their strengths in the project.Students will develop an appreciation for craftsmanship by valuing the importance of detail, quality, and precision in both the form and decoration of their work.Students will demonstrate responsibility and accountability by consistently following project deadlines, cleaning their workspace, and maintaining respect for shared tools and materials.Students will cultivate an awareness of cultural significance by respecting the history and symbolism of mandalas and other radial designs, recognizing their importance across various cultures.Students will approach their work with creativity and originality, finding personal expression and meaning in their design choices, while also experimenting with new techniques and combinations of materials.Students will develop confidence in their abilities as they see their skills grow throughout the project, recognizing the value of both the finished product and the effort involved in creating it.Students will exhibit a positive attitude towards the learning environment by staying engaged, participating actively, and maintaining focus throughout the duration of the project.
Formative Assessment
Check-ins when sketches are complete. Check-ins during class to ensure students are following appropriate steps. Photo submissions periodically during the process to catch students that may have been missed in class.
Summative Assessment
Assessment of the underglaze transfer, form, underglazing, and glazing. Each of these are separate summative assessments.
Reflection and Discussion
How did you choose the design for your mandala?Were there any specific symbols, shapes, or colors that you felt drawn to? Why?How does the central focal point of your mandala relate to the theme or message you're trying to express?In what ways does your push plate reflect the concept of a mandala?What do you think the symmetry and repetition in your design represent, both visually and symbolically?How does the radial balance in your design enhance its meaning or impact?What mood or feeling did you want to create with your color choices?How do the tints and shades in your design help create depth or emphasize certain parts of your mandala?Were there any unexpected results or happy accidents that changed your design direction?How did you approach the challenges of working with slab construction and attaching the feet to the plate?Is there a specific story or emotion that influenced your design choices?How do you feel when you look at your completed push plate? Does it evoke any particular thoughts or feelings?
Lesson Activities
Introduction and design
Students view a presentation on Mandalas and other radial designs and begin a worksheet which helps them to create symbols which represent important aspects of their own identity.
Radial Design
Students move to the radial design template which has 4 quadrants and guidelines. They will lay out their lines, shapes, and symbols to create four different designs which radiate from the center and would create a radial design if repeated.
Rotate and repeat (digital component)
Students use Google slides to repeat and rotate their designs to decide which one would work best for their final. When they are finished, we print their design and they trace it onto newsprint paper.
Slip-trailing to make an underglaze transfer
Students learn to slip trail and trace their design on newsprint paper using the slip-trailing process.
Form design
Students select an organic or geometric shape for their plate form. They will select feet which either contrast with or match their plate form. Then they create the template for their shape.
Construction
Students roll their slab using the slab roller OR thickness strips and cut all their shapes using their template.
Underglaze Transfer Application
Students transfer their design to their plate using the newsprint paper design, water, and a red rib. Controlling the amount of water is important, too much and the design will smear, too little and it won't transfer.
Pushing the plate
Students lay their clay onto foam, place their paper template on top, and push into the foam using a wooden template. This creates the lift of the walls. The clay must be plastic for this step.
Score, slip, and seal
Students add their feet using the score, slip, and seal process. The feet and plate may need to be blow dried. It should be leather hard for this step.
Firing the form
When construction is complete, the work is fired.
Underglazing
Students select a color scheme (primary, secondary, warm, cool, analogous, complementary, or monochromatic) which complements their design. Once they have selected their colors, they can apply them. We use paint pot strips and condiment bottles. The primary colors, white, and black are in the condiment bottles. Students must mix their colors in the paint pot strips. They need 2 coats of each color on their plate.
Firing 2
When students complete their underglaze, we fire again to set the underglaze so it doesn't smear.
Clear Glaze and firing 3
Students clear glaze their work and we fire for the last time.
Photo booth, self-evaluation, and gallery walk
Students photograph their work in our classroom photobooth, write about their work on their digital portfolio (glow and grow), and then we walk around the room and students leave 3 peers specific feedback on their work related to the rubric.

