Día de los Muertos Sugar Skulls
Meet The Teacher: Jordan Tracy
As the lead teacher for Clay Day LBC’s Mobile Pottery Studio, Jordan Tracy, brings the art of clay to thousands of TK-8th grade students in classrooms across Long Beach, CA, each year. Nothing is better than the excited shouts when children realize their classroom is receiving a visit from the Mobile Pottery Studio. “It’s a clay day!”
Project Description
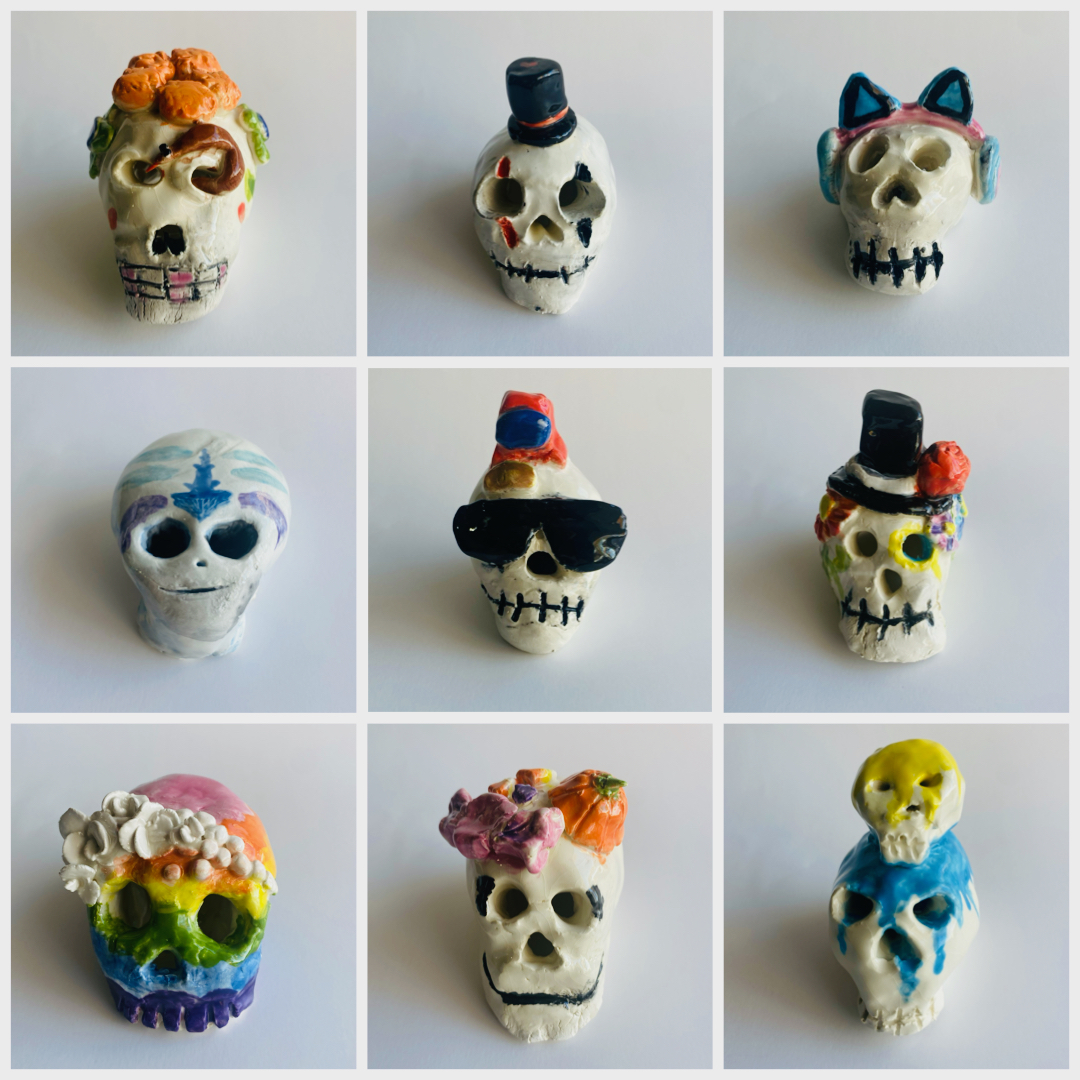
During this lesson, students combine functional pottery methods with sculptural ceramic techniques to create a hollow sugar skull embellished with unique expressions of identity. In a secondary lesson, students can then use underglaze to decorate the surface of their skulls with bright colors inspired by traditional Mexican calaveras.
Materials
- White low fire clay
- Underglaze
- Clear dip low fire glaze
- wood skewer tool
- paintbrushes
- white low fire slip
Grade Level
Elementary School
Difficulty
Easy
Student Hands-On Time
60 min.
Teacher Prep Time
30 min.
Project Cost / Cost Per Student
7
National Core Arts Standards - Visual Arts
- Creating - Generate and conceptualize artistic ideas.
- Creating - Organize and develop artistic work.
- Creating - Conceiving and developing new artistic ideas and work.
- Connecting - Relate artistic ideas to historical, cultural, and social contexts.
- Connecting - Connect personal experiences with artmaking and meaning.
21st Century Skills
- Critical Thinking & Problem-Solving
- Creativity & Innovation
- Flexibility & Adaptability
- Initiative & Self-Direction
- Social & Cross-Cultural Skills
- Productivity & Accountability
STEAM Education
- Arts
Learning Objectives: Knowledge
Students will have an introductory knowledge of Día de los Muertos. Students will know the basic steps to sculpt a 3-dimensional head.
Learning Objectives: Skills
Pinch pot construction, various sculptural techniques required to make a head, face, and identity "accessories," scoring and slipping, and successful application of underglaze
Learning Objectives: Attitudes/Values
Patience, resilience, flexibility
Reflection and Discussion
How does creative expression affect the way we remember and honor our ancestors?
Lesson Activities
Instruction and hands on learning--construction of the pinch pot head
Lead students through the construction of a small pinch pot.
Instruction and hands on learning--creation of the skull features
Move through the sculpting of the skull's features. Start by boring out the eyes with a wood tool, then cut a hole or slits for the nose. These holes should be big enough to allow light to pass through them if students want to use a tea light to illuminate it once the project is finished. Gently shape the chin, and finally inscribe a mouth into the surface of the clay using the wood tool.
Instruction and hands on learning--sculpting of identity "accessories"
Once students have finished the skull, introduce them to scoring and slipping. Allow them to explore sculpting accessories for their skull on their own. Reminding them that everyone they attach to their skull must be scored and attached with slip.
Clean up
This is a quick cleanup because there aren't many tools--close and store slip containers, rinse wood skewers in a large bucket of water to remove the slip, remove any table coverings, and wipe any remaining clay from the tables.
Step-by-Step Instructions
Step 1
Make a small pinch pot using about a chunk of clay about the size of your fist. Flip the pinch pot over. This is the beginning of the hollow skull.
Step 2
Using your thumbs, gently mark out the placement of the eyes. These should be about 1/3 of the way down from the crown of the skull's head. Once you know where the eyes will be, use a wood skewer and then your pinkie, gently bore out the holes of the eyes. These should be wide enough to allow light to pass through if students would like their project to be a illuminated votive.
Step 3
Below and between the eyes, lightly use your wood skewer to plan the placement of the nose. You can make the nose any shape you want--another circle like the eyes, 2 parallel vertical slits, a triangle, an unsize down heart. Practice on another small piece of clay until you find the nose shape that suits you best. Make sure the bridge of clay between the eyes and nose is thick enough not to break. Use the wood skewer as a unit of measurement. The bridge of clay between the eye holes and the nose holes should be no less than the width of the wood skewer.
Step 4
Your pinch pot is still very round. At this point, it looks like a bell. Gently grip the skull between your thumb and middle finger just below the space where the skull's ears would be. Gently squeeze. This will start to elongate the jaw. Now you can begin to lightly pinch the chin to make space for the mouth/teeth.
Step 5
The final facial feature is the mouth and/or teeth. Use the wood skewer to draw and then inscribe a mouth into the surface of the clay directly below the nose. Be careful not to cut through the clay as you make the mouth, as it weakens the spot where the skull will rest on a table.
Step 6
Take a moment to consider what identity "accessories" you would like to add. Explore 3-dimensional sculpture using these basic shapes: coils (worms/snakes), pebbles (little spheres), and pancakes (smashed spheres). Show a slide of how these basic shapes can become anything from glasses, to hats, to flowers, to hair.

