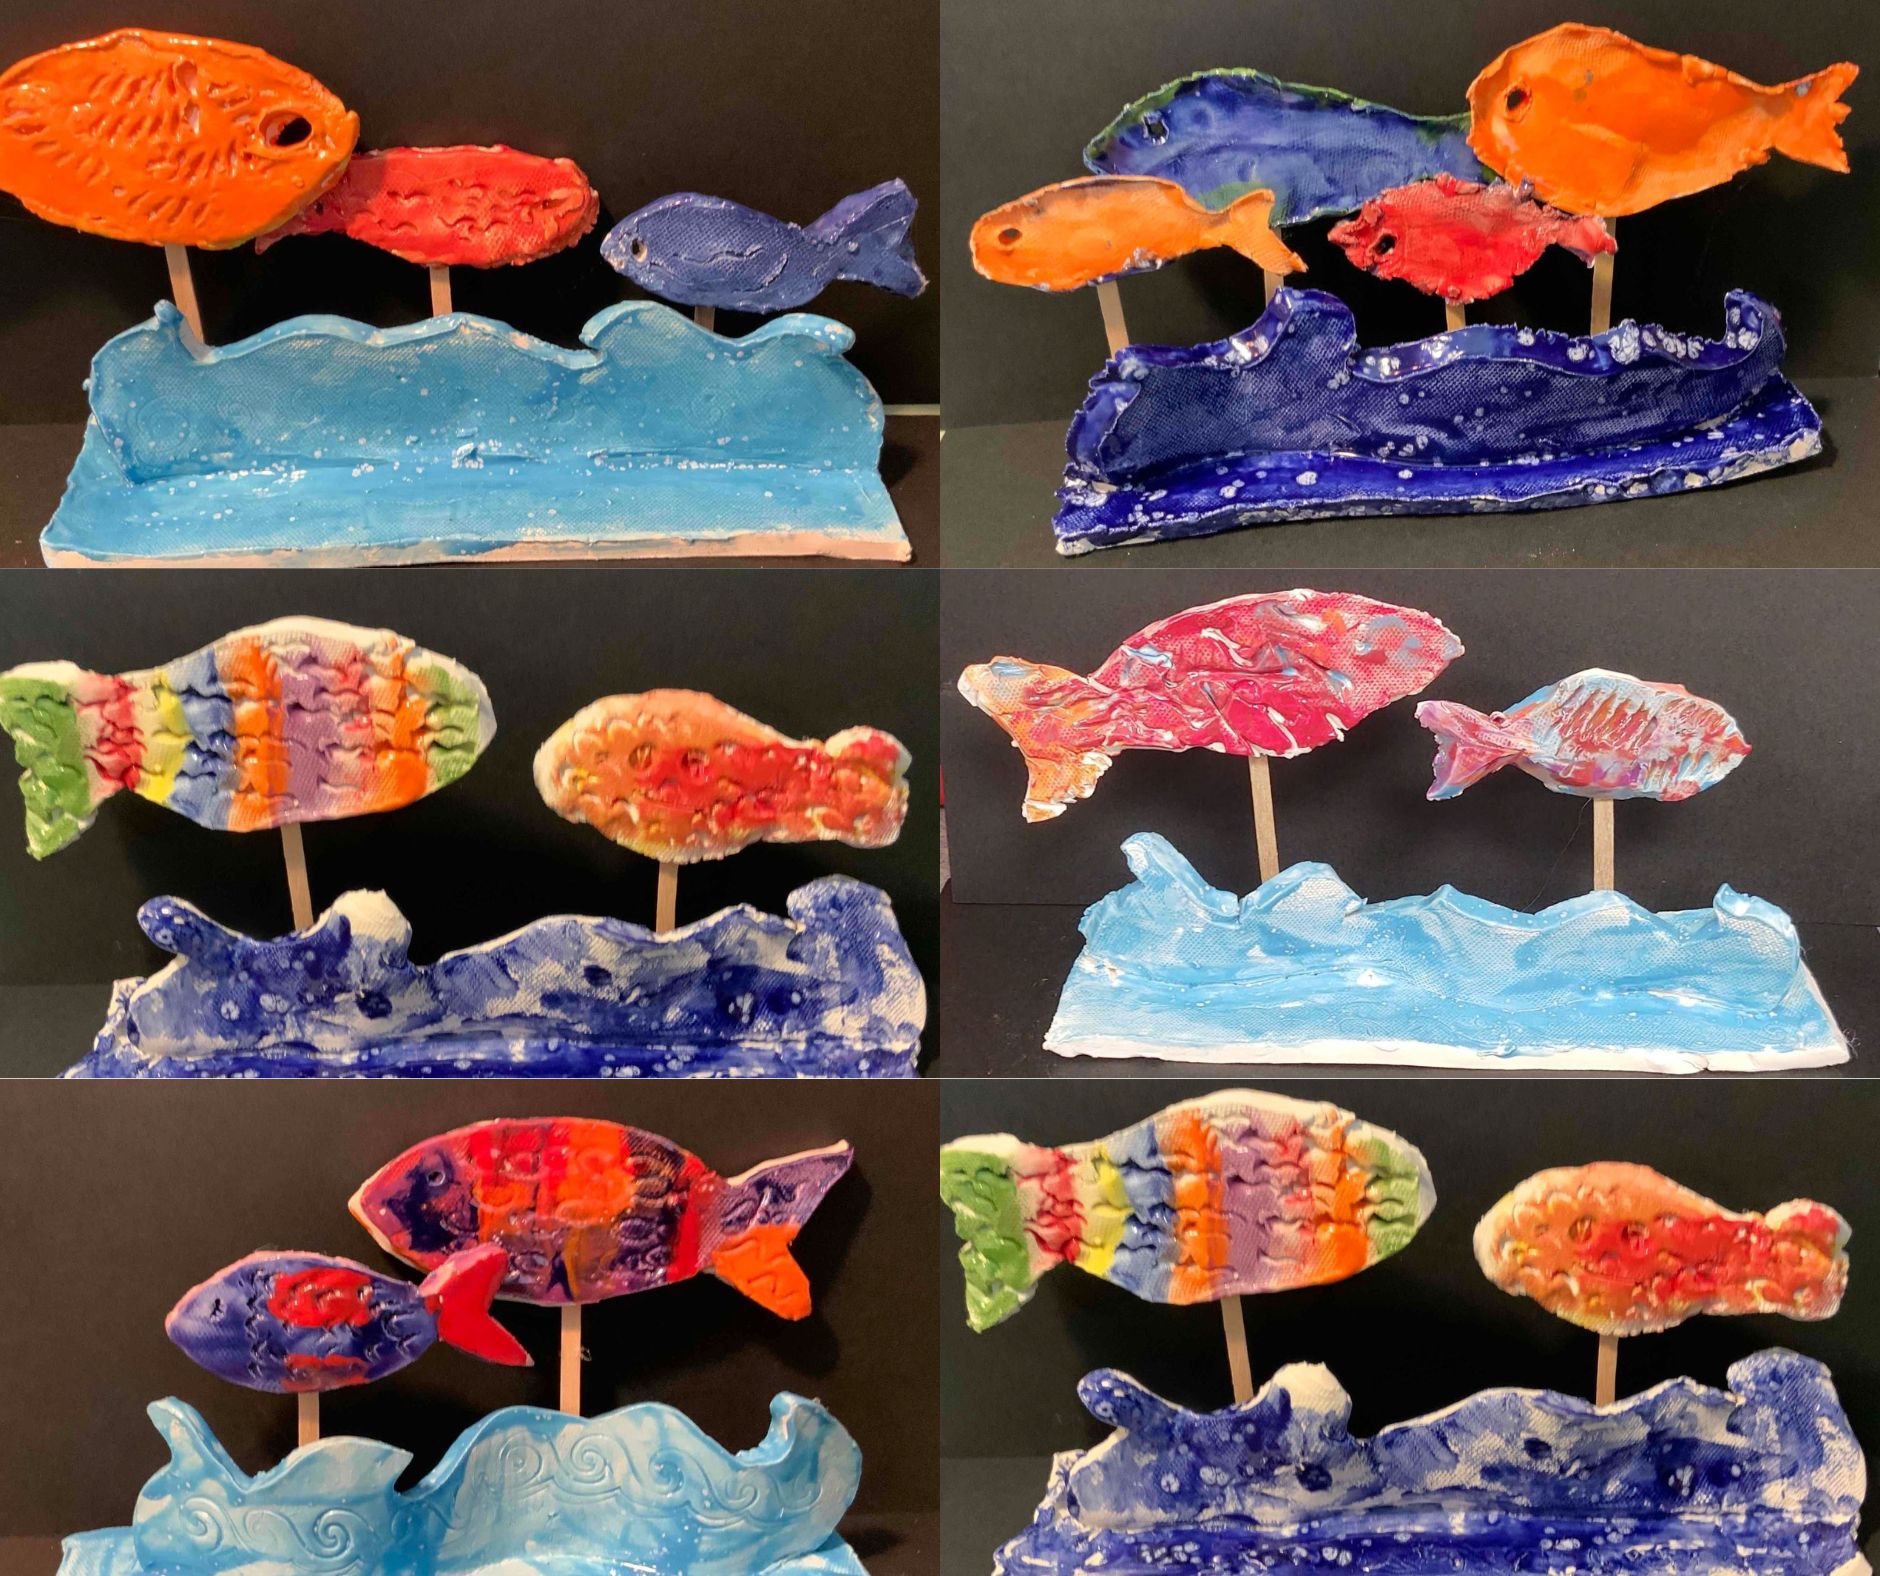
Ceramic Fish Sculptures
Meet The Teacher: Mary Hart
I am a Kindergarten through 8th grade art teacher. I teach at Iredell Charter Academy of Arts and Science in Troutman, NC. I love combining STEAM concepts and art. Check out more fun art projects in our online school gallery: https://www.artsonia.com/schools/school.asp?id=166532
Project Description
Students will explore slab building techniques and texture impressions in clay by creating a wave and fish sculpture.
Materials
- Natural Clay (I use low-fire) Cut slabs into 5in by 7in pieces for base/wave, Roll out leftover pieces to make fish or provide extra slabs that are 4inx4in
- Wooden Skewers for clay tools or Wooden Clay Tools
- Paper Templates (Rectangle 2inx6in, Wave Shape, Fish shapes)
- Wooden Coffee Stirrers or Thin Popsicle Sticks
- Glaze (Make sure it goes with type of clay being used)
- Paintbrushes
- Water Cups for attaching clay and for painting
- Hot Glue & Hot Glue Sticks
- Sticky Notes
- 2 ounce condiment cups (optional)
- Kiln stilts (optional)
- Kiln
- Dry Pasta Noodles such as penne, bow-tie, egg noodle, etc
Grade Level
Elementary School
Difficulty
Easy
Student Hands-On Time
2 sessions at 45 minutes
Teacher Prep Time
30 minutes
Project Cost / Cost Per Student
3
National Core Arts Standards - Visual Arts
- Creating - Generate and conceptualize artistic ideas.
- Creating - Organize and develop artistic work.
- Presenting - Develop skills for artistic presentation and exhibition.
21st Century Skills
- Critical Thinking & Problem-Solving
- Creativity & Innovation
STEAM Education
- Science
- Arts
Differentiations and Accommodations
Differentiation
Struggling Learners
Accommodation
Paper templates and a variety of pasta shapes help students of varying abilities to carve and create textures. Larger wooden clay tools may be provided if students struggle with the thin wooden skewers. Displaying the step-by-step images in the classroom while the students are creating helps them to remember the steps and chunks it into smaller parts.
Learning Objectives: Knowledge
Students will know how to trace/carve out shapes from clay. Students will know how to properly attach clay using the score/slip/stick/smooth method. Students will learn how to use dry pasta to create texture impressions in clay. Students will know how a kiln bakes clay. Students will know how glaze turns shiny in a kiln.
Learning Objectives: Skills
Students will be able to use SLAB construction to carve out fish and wave SHAPES. Students will be able to use various materials such a dry noodles to create TEXTURES in the CLAY. Students will be able to use SCORE/SLIP/STICK/SMOOTH to attach the clay pieces together to make a wave base. Students will be able to use GLAZE to paint their SCULPTURE.
Learning Objectives: Attitudes/Values
Students will be able to problem solve by learning how to attach clay and apply the appropriate about of pressure to create impressions. They will show perseverance by re-rolling out their clay if they make a mistake to try again.
Formative Assessment
As students are working, check to make sure they are using the score/slip/stick/smooth method to attach the wave to the rectangle base. Advise them to go back and add as needed. Check to make sure they are not adding too much pressure to the clay with the dry noodles to make a hole. If they make a hole, show the students how to reroll out the clay and try again.
Summative Assessment
Have the students talk about or write the following depending on their grade level: 1. What is one thing you learned while making your sculpture? 2. What is one thing you like about your sculpture? 3. What is one thing you would improve or change about your sculpture?
Reflection and Discussion
How can I make my sculpture unique even though I am using templates?
Lesson Activities
Slab Construction of Sculpture Pieces (45 minutes)
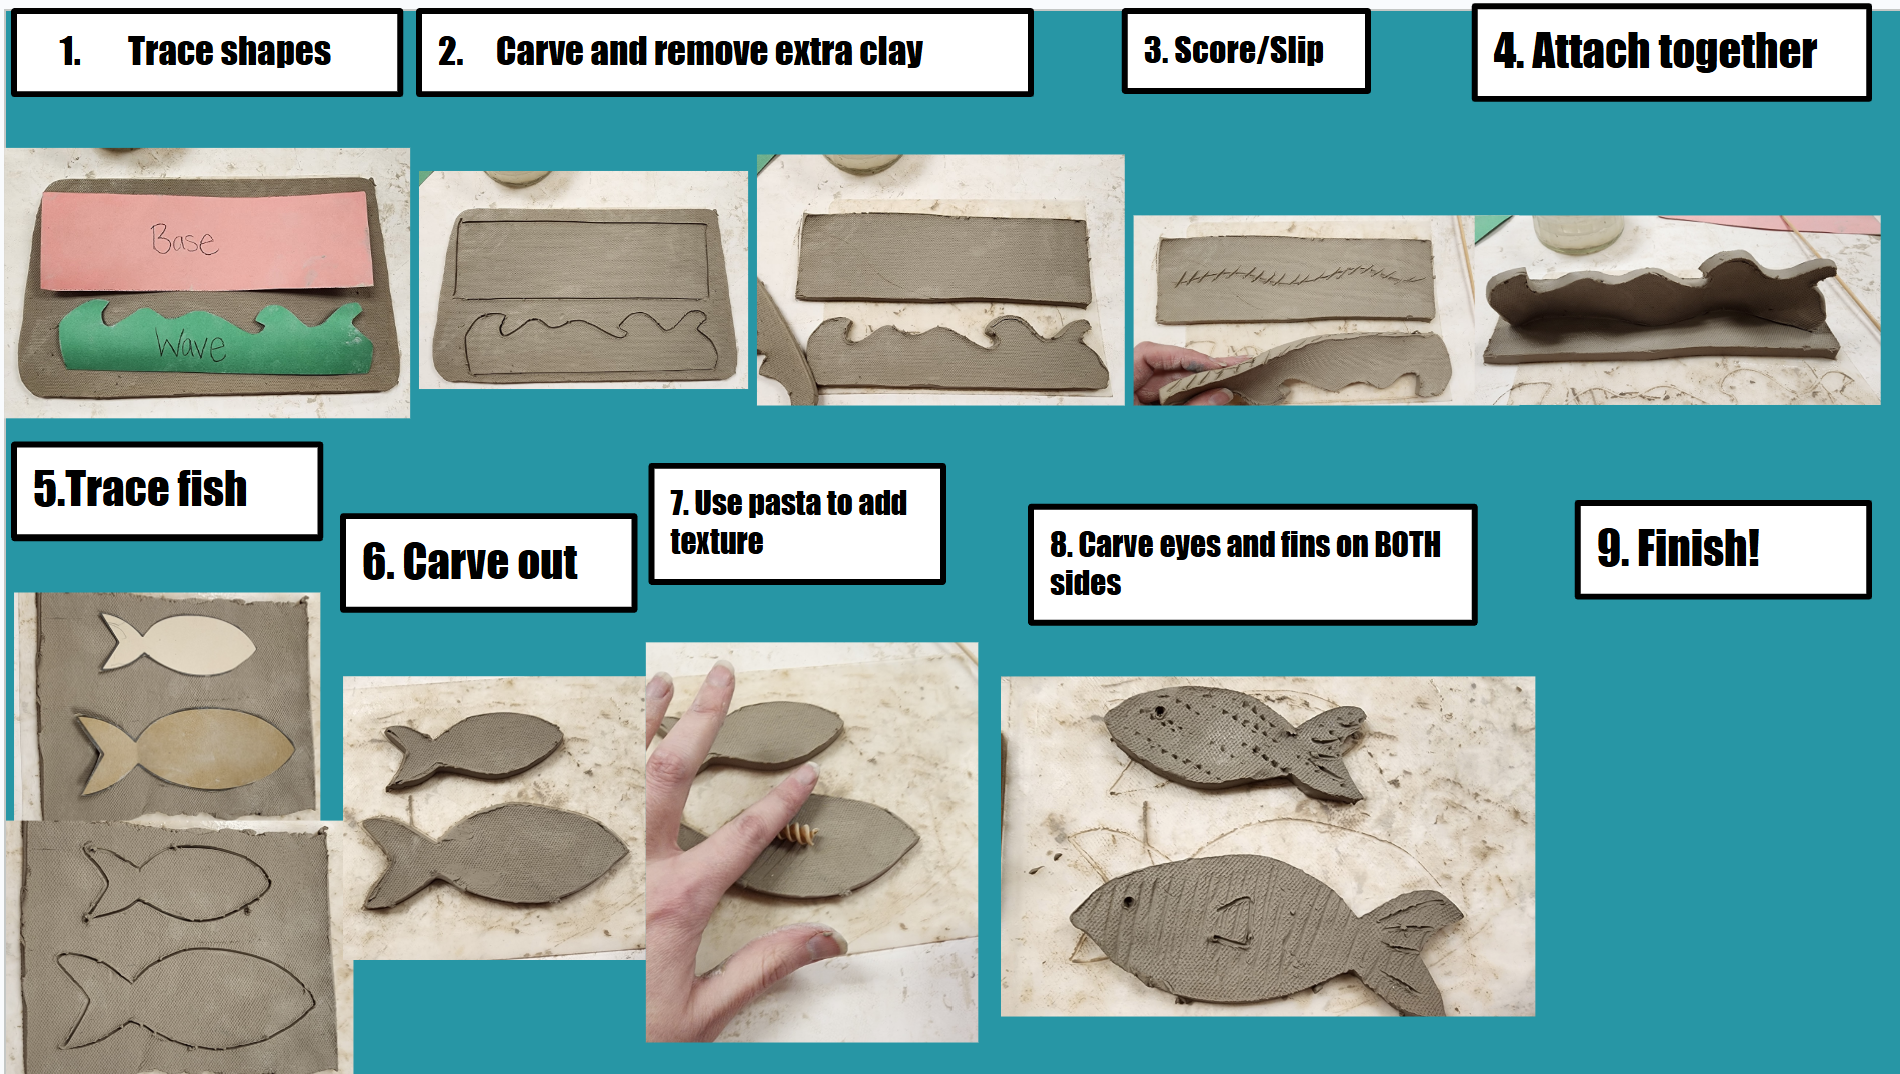
Demonstrate how to make the sculpture step by step and then have the students follow the steps to make their own sculpture. Use the provided step-by-step pictures to display while students are working to remind them of the steps. 1. Students receive slabs of clay and paper templates. They trace the rectangle and wave shape on the slab and carve out the shapes. 2. Students use the score/slip/stick/smooth method to attach the wave to the base. 3. Students can roll out the scrap pieces to trace the fish or be given a new slab to trace the fish. Students must trace at least 2 fish. 4. Students use dry pasta noodles such as penne, bowtie, and egg noodle to pressure textures into clay fish shapes. Make sure to add textures to both sides of the fish. 5. Once the steps are complete, have students place pieces of sculpture on a sticky note with their name to dry. Bake in kiln once bone dry. *Kindergarten-2nd grade: Teacher waits until sculptures are leather hard to carve names on the bottom of the wave base and uses a wooden coffee stir stick to poke 2 holes (or more - one for each fish) in the bottom of the base) *3rd grade and up may carve their own names and poke their own holes*
Glaze Sculpture Pieces (45 minutes)
Begin class by explaining what has happened to their clay projects since they have seen them last. Explain the stages of clay: plastic, bone dry, bisque. Show a picture of the kiln and explain how they have been fired and are now ceramic. Explain how artists use glaze to paint ceramics. Show pictures of glaze and tell how the paint they use today will be baked in the kiln one more time and then will turn shiny. 1. Pass out ceramic sculpture pieces. 2. Provide students with glaze. I usually put colors in 2 oz condiment cups. 3. Students use paintbrushes and glaze to paint their sculptures. Remind them to not paint the bottom of the wave base. I have my students paint both sides of their fish as I use kiln stilts to prop the fish from getting stuck to the kiln shelf. If you do not have kiln stilts have them only paint one side of the fish. 4. Have students place back on the tray to dry. 5. Bake in the kiln *Once baked attach the wooden coffee stir sticks with hot glue to the fish and then glue to the holes in the wave base* *Older students may help with this process*
Step-by-Step Instructions
Step 1
Here is a link to a google slide presentation with step-by-step images and other slides for project reference: https://docs.google.com/presentation/d/180_qybs9yqaCa7tCU_LII40E4Atv2ASsLtb_fwshnUQ/edit?usp=sharing

